

This no-knead bread recipe will make any novice baker look like a pro! 5 minutes of work yield a crusty, golden loaf with a perfect soft interior.


If you’re curious about bread-making, no-knead bread is a fantastic place to start. This method was made famous by Jim Lahey, owner of Sullivan Street Bakery in New York. It’s wildly popular, and for good reason. Unlike many bread recipes, it requires no special equipment (aside from a Dutch oven) or finicky ingredients, and it takes just a few minutes of hands-on prep. Still, thanks to a long, slow rise, the bread comes out perfect every time, with a gorgeous golden brown crust and chewy interior.
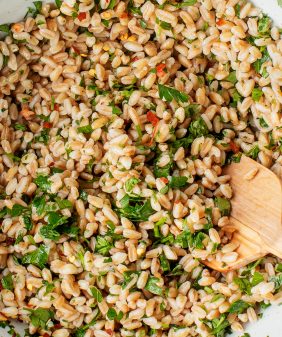
I make a few tweaks to Jim’s recipe, swapping bread flour for all-purpose and amping up the flavor with lemon zest and rosemary. It’s bright, aromatic, and soft, the perfect accompaniment to a hot bowl of soup or a delicious snack all on its own. Next time you’re in the mood for bakery-quality bread, skip a trip to the store, and bake this bread instead. It’ll be more fun, less expensive, and just as good (if not better). Trust me, this classic recipe isn’t one you want to miss.

No-Knead Bread Recipe Ingredients
You only need 6 basic ingredients to make a mind-blowing loaf of no-knead bread:
- Flour – Jim Lahey’s original recipe calls for all-purpose flour, and if it’s what you keep on hand, it will work in this recipe. However, Jack and I prefer to make this recipe with bread flour. The bread comes out slightly less dense, with a lighter, chewier texture that we can’t get enough of.
- Active dry yeast – This no-knead bread couldn’t rise without it!
- Lemon zest – I typically grate lemon zest when I’m cooking, but for this recipe, I dice it into small squares for a more intense lemon flavor. The whole loaf is lemony, but the bites with zest are extra-bright and fresh.
- Fresh rosemary – Its cozy flavor makes this loaf comforting and homey. Fresh thyme would be lovely here as well.
- Sea salt – It makes the bright, aromatic flavor of the lemon and rosemary pop.
Just add water, and you’re good to go!

How to Make No-Knead Bread
It’d be impossible to find an easier, more reliable bread recipe than this one. Here’s how you make it:
First, combine the flour, yeast, salt, lemon zest, and rosemary in a large bowl. Then, add the water and stir to form a very sticky dough. Cover the bowl with plastic wrap, and let the dough rest in a warm spot for 12 to 24 hours, until the surface is dotted with bubbles.

When the dough has risen, turn it out onto a lightly floured work surface. Sprinkle the dough with a little flour and fold it over onto itself once or twice. Cover it loosely and let it rest for 15 minutes.


Turn the dough out onto a lightly-floured work surface and quickly shape the dough into a ball.
Then, sprinkle cornmeal onto a flour sack type kitchen towel and place the dough, seam side down, onto the towel. Dust the top of the dough with more cornmeal.

Cover with another towel and let rise until the dough is more than double in size, about 2 hours.
30 minutes before the dough is ready, heat the oven to 450°F and place a 4-quart covered Dutch oven in the oven as it heats.

When the dough has finished rising, carefully remove the pot from the oven (it will be hot!). Turn the dough over, into the pot, so that it’s seam side up. If it looks messy, that’s ok! Use a sharp knife to cut three shallow slits on top of the dough. Then, cover it, transfer it to the oven, and bake for 30 minutes. Remove the lid and bake until the bread is golden brown on top.
Cool on a wire rack for 10 minutes before turning out the bread. Slice, and enjoy!

No-Knead Bread Recipe Tips
- Let the dough rise somewhere warm. Because yeast responds to warmth, letting your dough rise in a warm place will yield the best results. We like to put ours on a sunny windowsill!
- Time the first rise based on your schedule. This bread turns out well after an initial rise of anywhere from 12-24 hours. That’s a big range! You might notice slight differences in the final loaf depending on how long the rise is (it’ll be puffier the longer it goes), but really, this range is just to give you flexibility. As long as the dough is dotted with bubbles when you move on to the next step, let it rise for as long as is convenient for you.
- Be gentle. When no-knead bread comes out well, it’s dotted with air bubbles, and it has a light, soft texture. To achieve this, be gentle with the dough. After the initial rise, turn the dough out of the bowl carefully, taking care to preserve as much volume as you can while you work with it. Whatever you do, don’t punch it down!
- Not sure if your dough is ready to bake? Poke it! To make sure your dough is ready to bake after its 2 hour rise, poke it with your finger. If it springs back right away, let it rise a bit longer. It’s ready to bake when it slowly bounces back.

Serving Suggestions
Crusty and flavorful, this no-knead bread is delicious on its own with a pat of butter or drizzle of olive oil. Enjoy it as a snack or light breakfast, or pair it with any soup, salad, or pasta recipe.
We like to eat it fresh the first day with whatever we’re having for dinner. Then, I slice and freeze whatever’s left. Later, I pop frozen slices directly in the toaster to make avocado toast or to serve with a larger meal. If you don’t want to freeze your bread, store it in an airtight container at room temperature for up to two days.

If you love this no-knead bread recipe, try our homemade focaccia next!

No-Knead Bread
Ingredients
- 3 cups bread flour
- 1/4 teaspoon active dry yeast
- 1 1/2 teaspoons sea salt
- 1 tablespoon diced lemon peel
- 1 tablespoon minced rosemary
- 1 1/2 cups water
- 1/4 to 1/3 cup Cornmeal
Instructions
- In a large bowl, combine the flour, yeast, salt, lemon, and rosemary. Add the water and stir until blended. It will be very sticky. Cover the bowl with plastic wrap and let rest in a warm spot (75° is ideal) for 12 to 24 hours, until the surface is dotted with bubbles.
- Place the dough on a lightly floured surface then sprinkle with a bit more flour. Turn the dough over onto itself once or twice. The dough will be very wet and sticky - that's ok - just don't knead the dough. Cover loosely and let rest for 15 minutes.
- Turn the dough out onto a lightly-floured work surface. Lightly flour your hands and gently shape the dough into a ball without kneading it. Sprinkle cornmeal onto a flour sack type kitchen towel and place the dough, seam side down, onto the towel. Dust the top of the dough with more cornmeal. Cover with another towel and let rise until the dough is more than double in size, about 2 hours.
- 30 minutes before the dough is ready, heat the oven to 450°F and place a 4-quart covered Dutch oven in the oven as it heats.
- Use oven mitts to carefully remove the pot from the oven. Turn the dough over into the pot so that it’s seam-side up. If necessary, shake the pan a bit to evenly distribute the dough. Use a sharp knife to cut three shallow slits on top of the dough. Cover and bake for 30 minutes, then uncover and bake 15 to 30 minutes more, until golden brown on top.
- Cool on a wire rack for 10 minutes before removing from the pot.
Adapted from Jim Lahey’s no-knead bread recipe, via Mark Bittman and the New York Times.


This bread is so good and easy. I used my sourdough starter instead of the yeast. I also used a towel instead of plastic wrap on the first rise and the bread STILL came out great. I’m at high altitude so I added a little more water. So good! next time I will put garlic and rosemary in..can’t wait.
Hi Rachel, I’m so glad you enjoyed the bread!
This bread tastes AMAZING! Exceeded expectations. Crunchy on the outside and fluffy inside. The lemon and rosemary combo is fragrent but not overpowering. Looks like we bought it from an artisan bakery. Highly recommend and will definitely make this again!
Am wondering if this recipe would still work using wheat flour, without affecting the texture? Maybe 2 cups all-purpose flour and 1 cup whole wheat?
Hi Helen, I’m so glad you loved the bread! We haven’t tried using wheat flour here, so I can’t say for sure how it would go, but I think using 2 cups AP flour and 1 cup wheat should be fine. If you try it, let us know how it goes!
Hi Phoebe,
So I made this recipe with 2 cups white bread flour and 1 cup whole wheat flour and it’s very tasty – sightly fluffy inside and crunchy on the outside but significantly denser than the original recipe. I really like the wheaty texture but next time I will use 2 1/2 cups white bread flour and only 1/2 cup whole wheat flour. This recipe is now on repeat on our house! Wish I could post a photo of my bread but don’t see an option to do that here. ?
Great to know how it went, thanks for following up!
I just got a Dutch oven and want to try this recipe. Can you leave out the lemon and rosemary? My husband is not a big fan of those two?
Hi Emma, Yep! You can skip them.
I only have a 2 quart Dutch oven. Can I halve the recipe??
Hi Debbi, I think that might work? I haven’t tried so I can’t confirm the timing.
I’d love to get 2 loaves from this. What increase in measurements would you recommend
I’ve seen previous recipes that use parchment paper to lower the bread into the Dutch oven and to remove it following baking. Considering the chance of a severe burn if one were to accidentally touch the pan, do you see anything wrong with that method?
Hi Karen, you could use parchment if that’s easier for you.
Hi, how much weight (in grams) is flour in that recipe ?
Might sound dumb, but do you put in the 1 /4 teaspoon of active dry yeast “dry”/just the dry yeast or after activating it?
I kept it covered the entire time and lowered the heat after the first 30 minutes and it was really really crusty. Anything I can do to keep it from getting so hard on the outside?
Otherwise this was perfect! Making another 2 loaves for a dinner party this weekend!
Hi Nikki, you could try reducing the oven temperature?
The bread was a huge hit! I make it a couple of times a week and give to friends.
Could I make this with rye flour?
I’m so glad you enjoyed it! I haven’t tried, but I’d start buy subbing in a little at a time.
Have you experimented with increasing the recipe to make a bigger loaf? I’d love to have this turn out 1.5x the size.
Love the recipe, the best bread I’ve ever made!
The most AMAZING bread! I usually fail with breads and cakes, baking in general but this was a huge success! Lovely crust and a soft center. LOVE!
I want to make this recipe, but I don’t own a Dutch oven! Can I try baking it on a sheet pan or is the Dutch oven essential?
I was very skeptical of this no knead recipe and made two other types of bread in addition to this one just in case it didn’t come out good. Well this recipe blew the other two out of the water. It is now my absolute favorite bread recipe and I have been making bread on and off for several years. I am making it today with a friend to show her the recipe. Totally try this recipe you will not be sorry. It tastes better than the bread you get at Panera or any other restaurant. Love Love Love!!! thank you
Can I make this bread Gluten Free?
Maybe using Bob’s 1:1 GF?
Thanks!
Hi Susan, we haven’t had success with GF 1:1 flours in yeasted bread recipes like this.
Oh my, we LOVED This bread!! My friend said, oh this is just like you’d get in a restaurant .. crunchy in the outside and soft in the middle, drool! And at altitude! We love it and are looking at maybe switching up some of the spices for cinnamon and raisins … thoughts??
I’ve been using your recipes for everything the last few months. Sooo good!
Hi! How can I adjust the recipe for a 5.5 qt dutch oven?
Omgosh… My husband I just pulled this baby out if the oven and it taste and looks delicious!
Thank you so much for this!
I’m so glad you both loved it!
I think I under baked mine because I was afraid it was getting too brown on top. It already had your finished color when I took the lid off. Should I keep the lid on to finish cooking? Or put foil on top?
Hi Courtney, I’d let it keep going with the lid on to keep it from browning any more. Hope that helps!
This is so delicious, just made it. Thank you for sharing!! My only comment is that the crust was SO crusty. Like, worried about my teeth when I chew it – crusty. Maybe that means I cooked it too long, ?? not sure. But it’s great.
Hi Holly, I’m glad you enjoyed it! I’d try baking it less or turning down your oven temp for the second half of the baking (once you uncover it). It might get less crusty at 425?
Hi I cannot find flour sack towels is there an alternative? I have everything else that’s needed.
Hi Desiree, any clean kitchen towel is fine – I’d say just avoid one that has large fibers that could stick to the sticky dough too much.
Hopefully the yeast will bubble. Don’t know why when I make bread it’s not anymore at my new home.
Hi Mariann, it’s possible newly purchased yeast can be expired (you never know how long it’s been sitting on the store shelf). We’ve had this happen a few times, it’s always solved with new yeast.
Do you put the yeast in “dry” or after it activates?
Hi Remi, it goes in dry here.