

These homemade granola bars are SO much better than any kind you'd buy at the store. They're easy to make, and they're chewy, nutty, and delicious.

A few weeks ago, I started craving the granola bars I ate as a kid. They had a chewy texture, a sweet, oat-y flavor, and pockets of mini chocolate chips. These days, I don’t keep packaged snacks around the house, but I always have old fashioned oats, nuts, and seeds in my pantry. I might not have had the exact granola bars I was craving on hand, but I could make homemade granola bars that’d be even better!
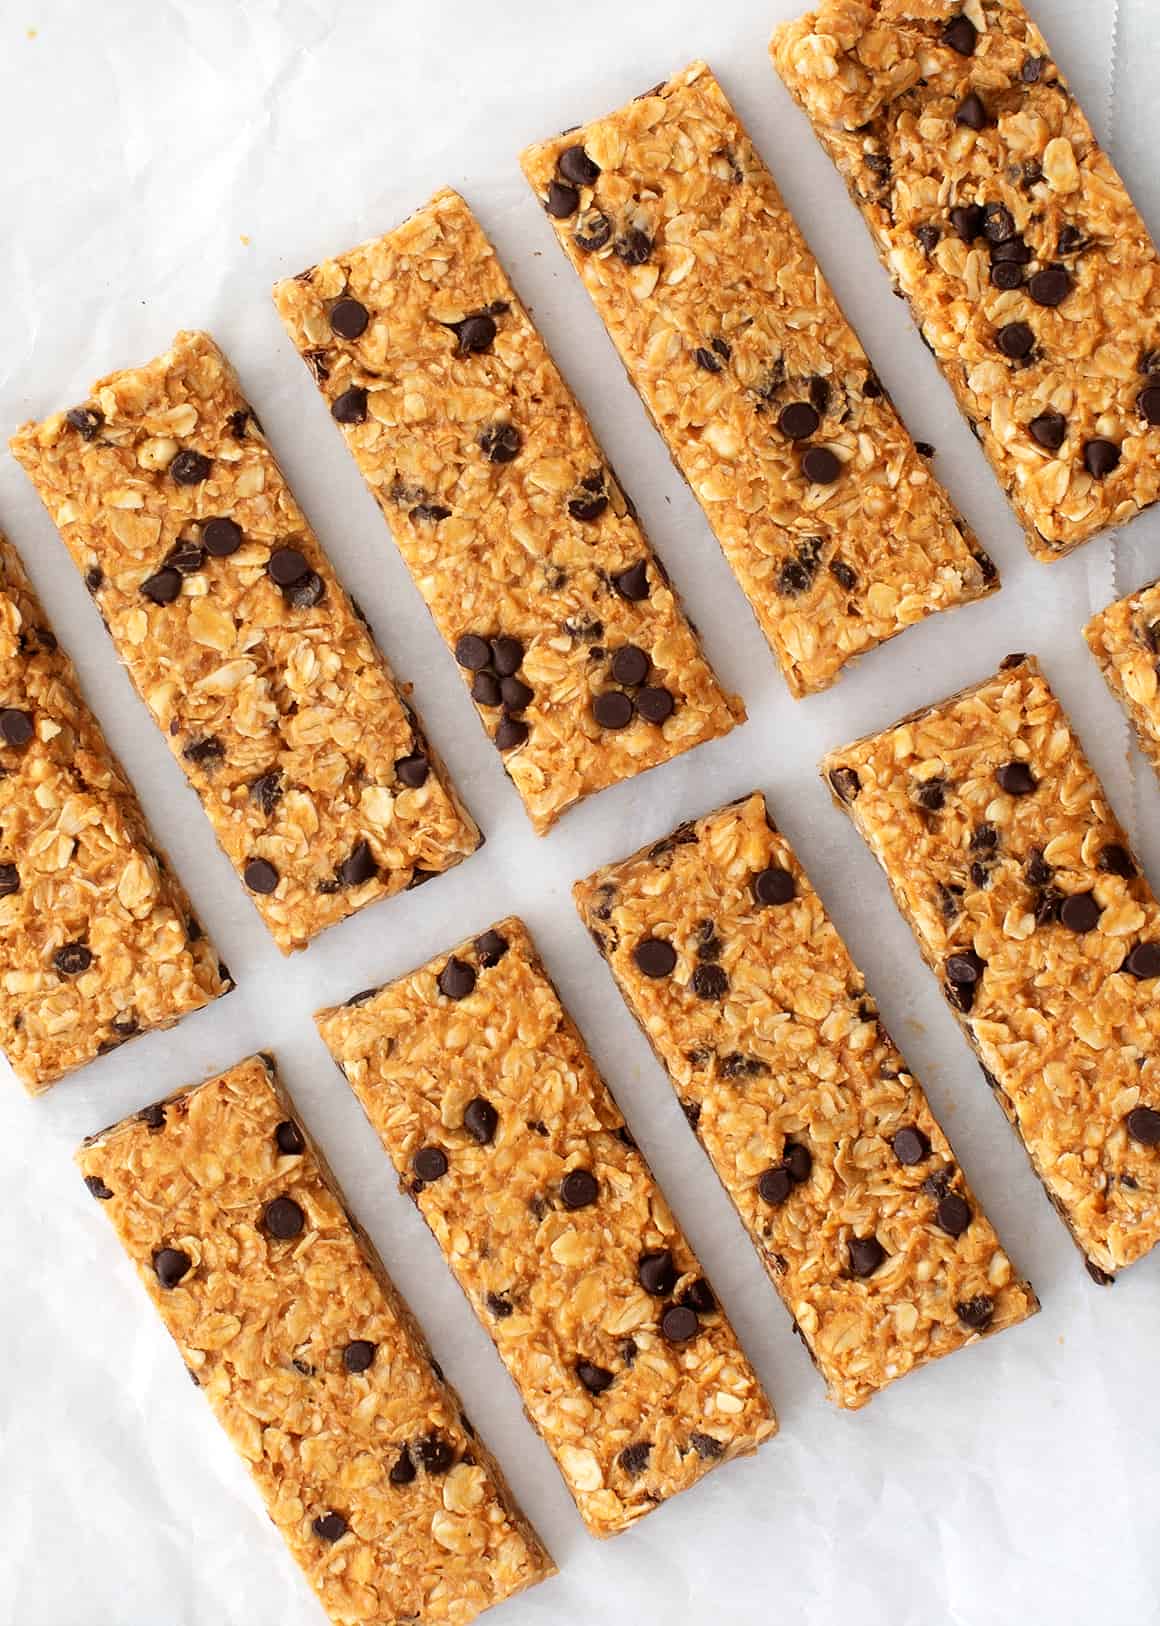
Fast forward to now, and I’ve made this granola bar recipe more times than I can count. It’s a breeze to make, and the bars are fantastic. They’re chewy, sweet, nutty, and studded with just the right amount of chocolate chips. Filled with wholesome ingredients like oats, pepitas, and nut butter, they’re healthy enough to pass for breakfast, but they’re also a perfect afternoon snack.
Granola Bar Recipe Ingredients
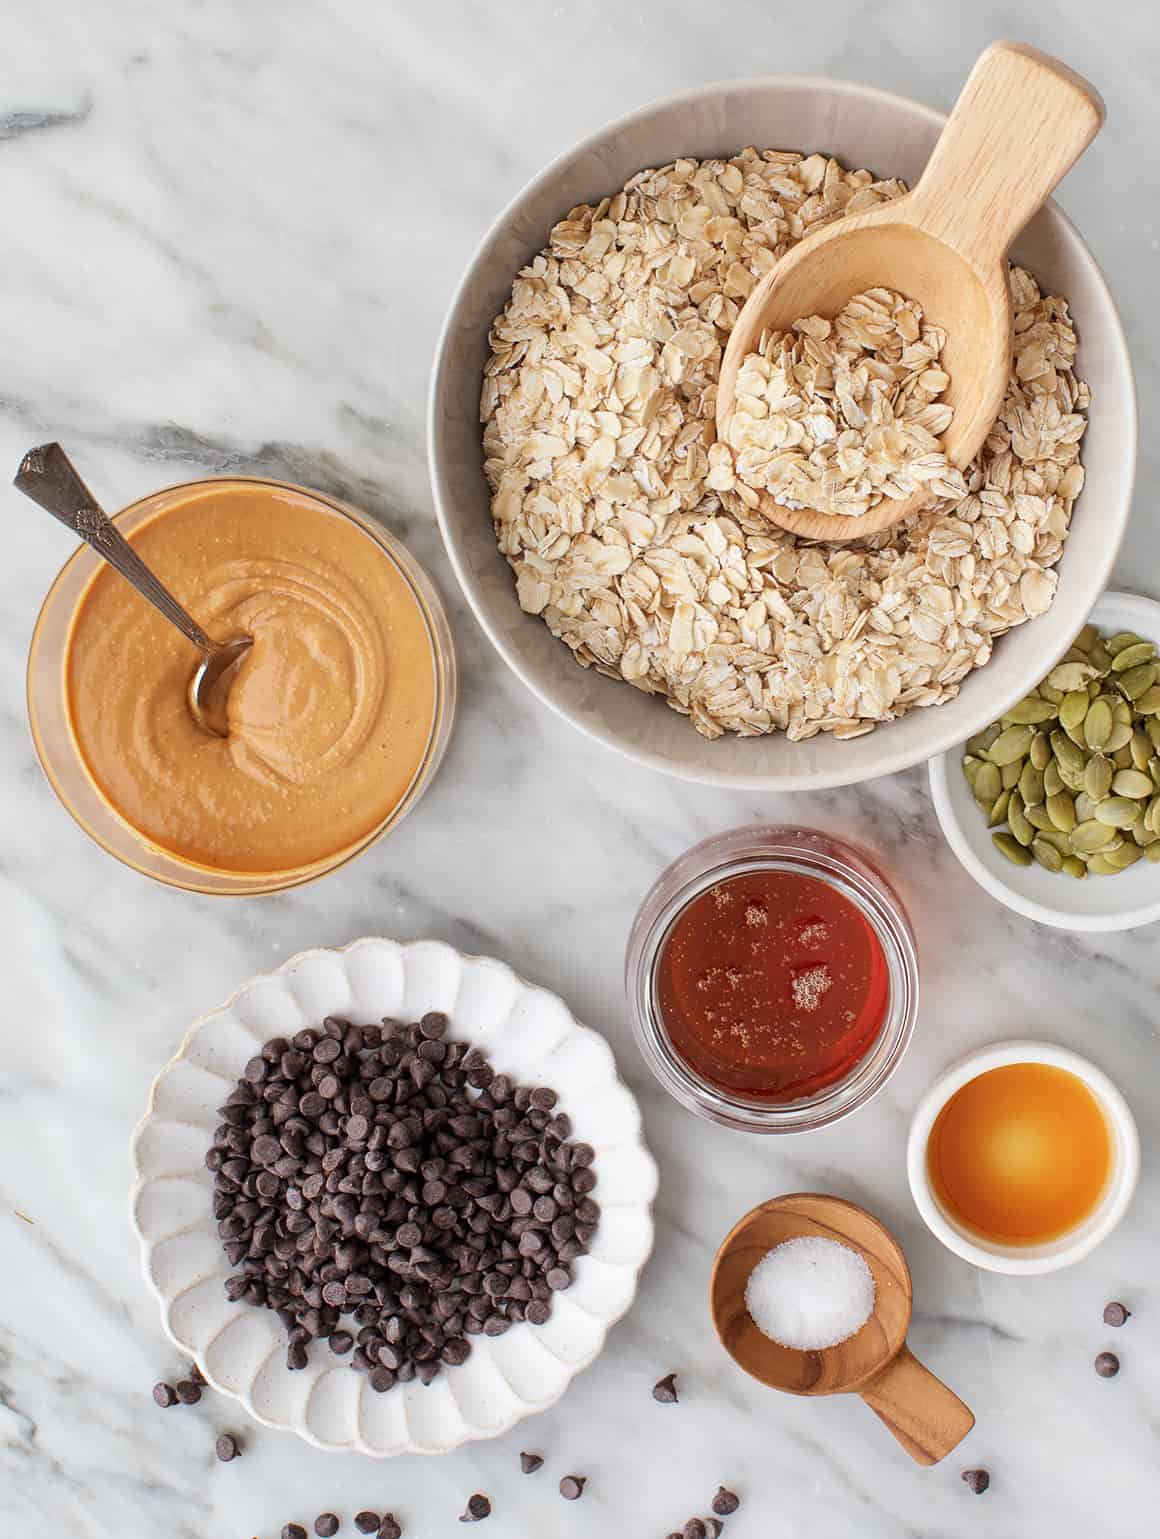
You only need 7 basic ingredients to make this homemade granola bar recipe:
- Natural peanut or cashew butter – It helps bind the bars together, and it adds protein, healthy fats, and irresistible nutty flavor.
- Whole rolled oats – They give these bars a perfect chewy texture. If you’re gluten-free, make sure that you use certified gluten-free oats.
- Honey – Along with the nut butter, it helps all these ingredients stick together! I love its warm amber flavor in this recipe.
- Vanilla extract – It amps up the bars’ warm flavor.
- Sea salt – To make all the rich, sweet, and nutty flavors in this recipe pop!
- Pepitas, crushed peanuts, or cashews – They add healthy fats, protein, and crunch.
- Mini chocolate chips – Who doesn’t love nut butter and chocolate?! Be sure to use mini chocolate chips here, as regular chocolate chips are too big to make cohesive bars. If you don’t have mini chocolate chips, finely chopped dark chocolate will work in their place.
Find the complete recipe with measurements below.

How to Make Granola Bars
You won’t believe how easy it is to make this homemade granola bar recipe! Here’s what you need to do:

First, stir together the wet ingredients – the cashew or peanut butter, honey, vanilla extract, and salt.

Mix until the honey is fully incorporated. It will smell amazing!

Second, fold in the dry ingredients – the oats, chocolate chips, and pepitas. The mixture might seem dry at first, but keep stirring! Everything will be fully incorporated in no time.
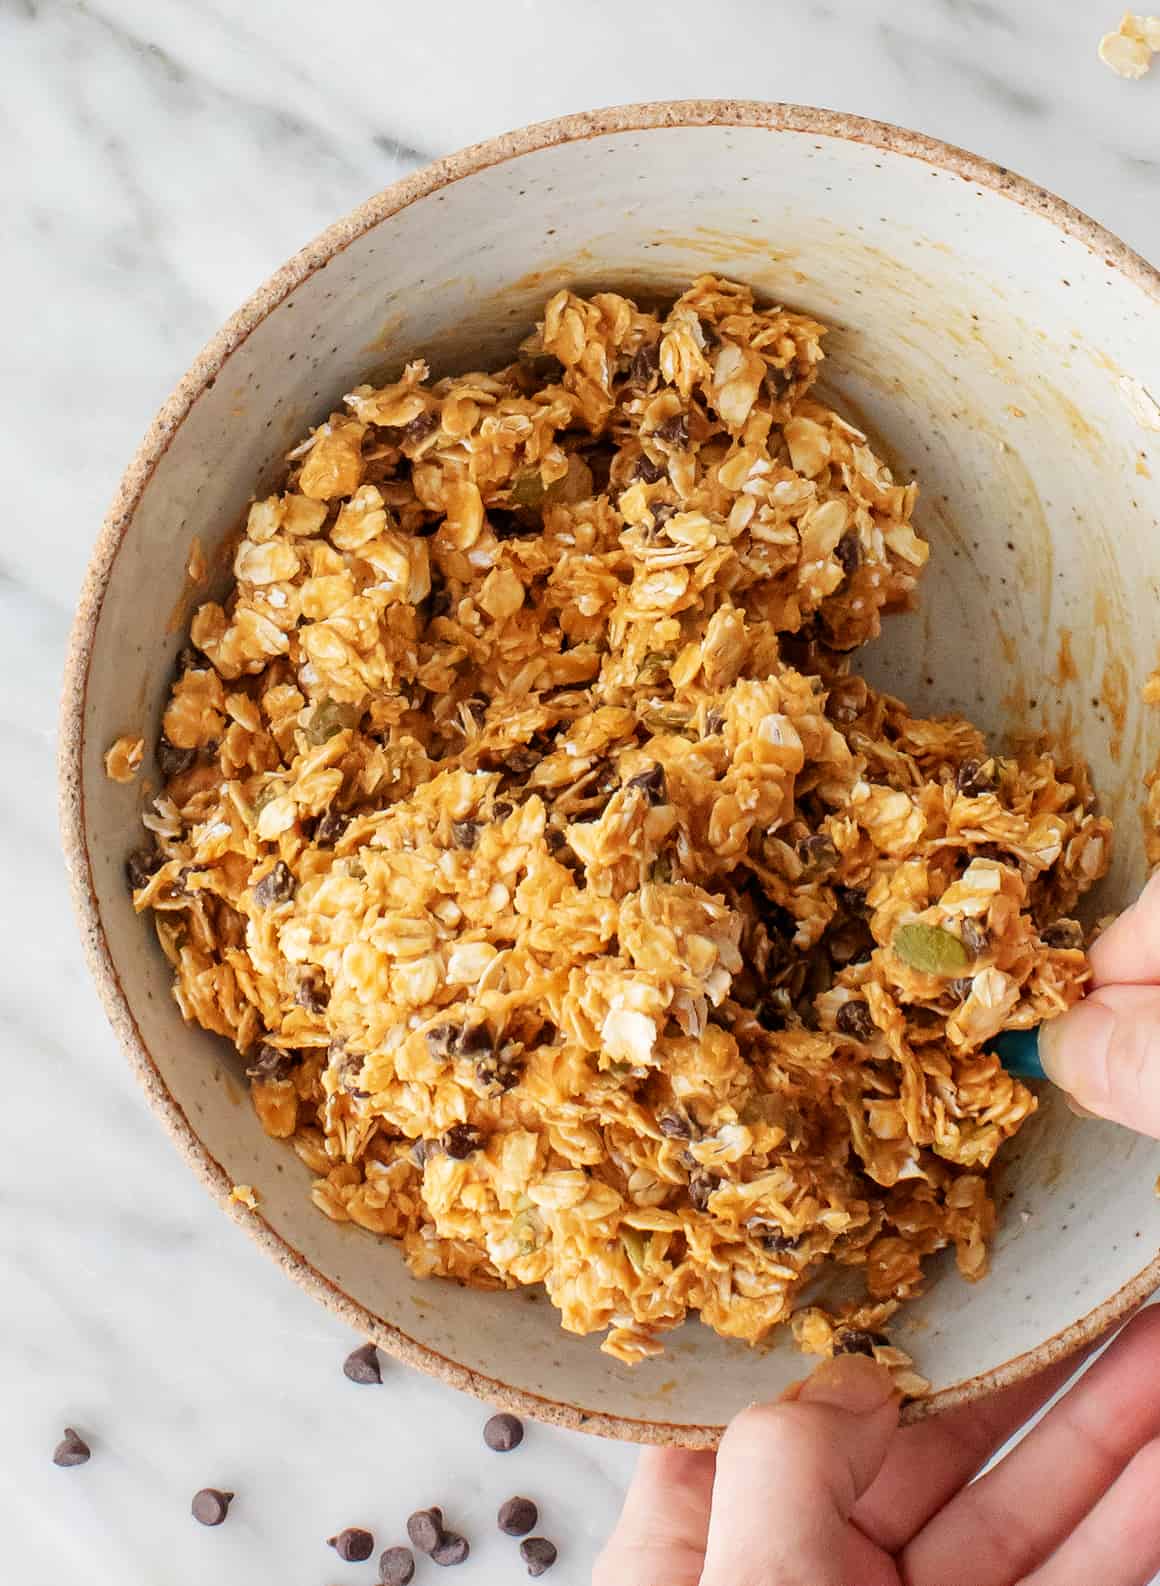

Next, press the bars into a parchment-lined baking pan. Scoop the mixture onto the bottom of the pan, and cover it with another sheet of parchment paper. Firmly press the mixture to the sides of the pan with your hands. Then, use the back of a measuring cup to smooth and flatten the tops of the bars.
Finally, chill! Transfer the pan to the fridge, and allow the mixture to chill for one hour before you slice and eat the bars. That’s it!

Granola Bar Recipe Tips
- Use runny nut butter. Look for natural cashew or peanut butter with a smooth consistency to make this recipe, not the dry, stiff stuff that you might find at the bottom of a jar. If your nut butter is too dry or thick, it won’t bind the oats, chocolate chips, and nuts or seeds into cohesive bars. Use creamy nut butter, not crunchy.
- Don’t cut the chilling time short. It’s tempting to slice and eat these bars as soon as you press the oat mixture into the pan, but in order for them to be chewy and cohesive, they really need to chill. Pop the pan in the fridge for at least one hour before slicing and eating the bars.
- Store them in the fridge or freezer. Once you slice the bars, cover the pan and store it in the fridge, or transfer the bars to an airtight container. I recommend storing them with a sheet of parchment paper between layers so that the bars don’t stick together. They’ll keep for up to a week in the fridge, but you can also freeze them for up to 2 months. I like to eat these granola bars straight out of the fridge, but if they’re frozen, let them thaw at room temperature for 20 minutes before you eat.

Homemade Granola Bars Variations
- Change up the mix-ins! I love the combination of mini chocolate chips and pepitas in these bars, but they’re delicious with other mix-ins too. Shredded unsweetened coconut, chopped dried cranberries, sunflower seeds, and dried currants are a few of my favorites. Feel free to use what you like, but make sure that you chop any dried fruits or nuts to a small size. You should also maintain the ratios I use in the original recipe. If the mix-ins are too large, or if you add too many, the bars won’t hold together.
- Make them vegan. To make these granola bars vegan, substitute brown rice syrup for the honey. If you can’t find brown rice syrup, you can use maple syrup here. It’s not sticky enough to bind this mixture into cohesive bars, but it makes delicious energy balls! If you use maple, roll the oat mixture into 16 balls before you chill it. They make a perfect bite-sized snack!

More Favorite Oat-y Treats
If you love this chocolate chip granola bar recipe, try one of these oat-y treats next:
- No Bake Cookies
- Homemade Granola
- No Bake Energy Balls
- Strawberry Rhubarb Bars
- Perfect Oatmeal Cookies
- Oatmeal Breakfast Cookies
Then, check out this post for 47 more healthy snack ideas!

Homemade Granola Bars
Equipment
- 8x8 Baking Pan (I always use this pan from Ateco)
Ingredients
- 1 cup very smooth creamy natural peanut butter , or cashew butter
- ⅔ cup honey
- 1 teaspoon vanilla extract
- Heaping ½ teaspoon sea salt
- 2½ cups whole rolled oats
- ⅓ cup mini chocolate chips*
- 3 tablespoons pepitas, or crushed peanuts or cashews
Instructions
- Line an 8x8 baking pan with parchment paper.
- In a large bowl, stir together the peanut butter, honey, vanilla, and salt, until smooth.
- Add the oats, chocolate chips and the pepitas (or nuts). The mixture might seem dry at first, but keep stirring and it'll come together. Stir to combine and press firmly into the pan. Use a second piece of parchment paper and the back of a measuring cup to help flatten the mixture. Chill for at least 1 hour, then slice into bars.
- Store bars in the fridge.


I baked them instead of chilling for about 15 minutes at 325, as per another recipe. Not sure if this does anything lol! Maybe binds the ingredients together? Anyways, they are great.
So glad you’re enjoying them!
Do you have the recipe breakdown? Calories, carbs, protein etc. thanks
Hi!
We loveeeeee these in our family! I eat them more than the kids. However, I do try to watch my intake of sugar/calories. Anyone know about how many calories a bar would be?
Based on my calculations (assuming you do 8 bars per batch), they would be about 430 cals per bar with the specific brands of ingredients I used. I’m not sure about total sugar though
Both my husband and I like these. My sister in law has a recipe that call’s for coconut oil,but that is not heart healthy.
Do these harden so they’re not so sticky? Mine have been in the fridge for now an hour and a half and I just cut them into bar shapes and they’re so sticky. It’s like eating peanut butter with some oats in it. Super tasty, but sooooo sticky.
Hi Bri, they dry out slightly as they chill, but they’ll still be somewhat sticky.
I had the same issue. Instead of 2/3 cup honey I did 1/3 cup + 1 Tbsp honey. Worked out perfectly no longer sticky and still holds the shape
I added only half the honey because I don’t like super sweet granola bars, but then it didn’t hold together. The result was basically like eating peanut butter with some oats in it. Okay, but I’d like to find a recipe where sugar isn’t the only way to keep it held together.
These are a staple in our house for the past few years. Thank you for this recipe !
Have you ever frozen them?
Hi Karlie, yes! These freeze well. So glad you love them!
Made these for my husband for father’s day. Added chopped dried apricots. A hit!
Hi Vika, love the idea of adding apricots here! I’m so glad the recipe was a hit.
Too much peanut butter. I’ve never had a bat with this much peanut butter, didn’t feel like how granola should be. But I get why people like it, is eating peanut butter and everyone likes peanut butter.
I dipped them in melted dark chocolate too….yummy. Plus, I buttered my hands and mixed it at the end. Great recipe.