

Even bread beginners can pull off this homemade focaccia recipe! Topped with olive oil, rosemary, and sea salt, it's SO delicious and easy to make.


This focaccia recipe is our favorite bread to bake at home. We love it because it’s soft and pillowy in the middle, crisp and golden around the edges, and filled with rich flavor from olive oil and sea salt. And that’s just the start! The #1 reason we love this focaccia recipe is that it’s so easy to make.
When Jack first started baking bread (15+ years ago now!), he made lots of rustic ciabatta loaves. The ingredients were simple, and the bread came out delicious, but it required hours of rising and precise kneading. So when we discovered how simple it is to make really good focaccia bread, we didn’t look back.
Now, this focaccia recipe is our go-to. We first published a version of it in my cookbook Love & Lemons Every Day and have since revised the recipe to yield an even lighter, crisper focaccia that we can never get enough of. It’s a wonderful recipe for bread beginners and seasoned bakers alike—simple, forgiving, and always delicious.
What is focaccia bread?
Focaccia (pronounced foh-KAH-chyuh) is an Italian style of bread. According to Essentials of Classic Italian Cooking by Marcella Hazan, it’s most closely associated with the northwestern Italian region of Liguria and its capital city Genoa.
You can recognize focaccia by its flat shape and characteristic dimpled surface. Made with an olive oil-enriched, salted dough, it might be baked plain or topped with vegetables, herbs, and/or cheese. Find some of my favorite toppings in the post below!
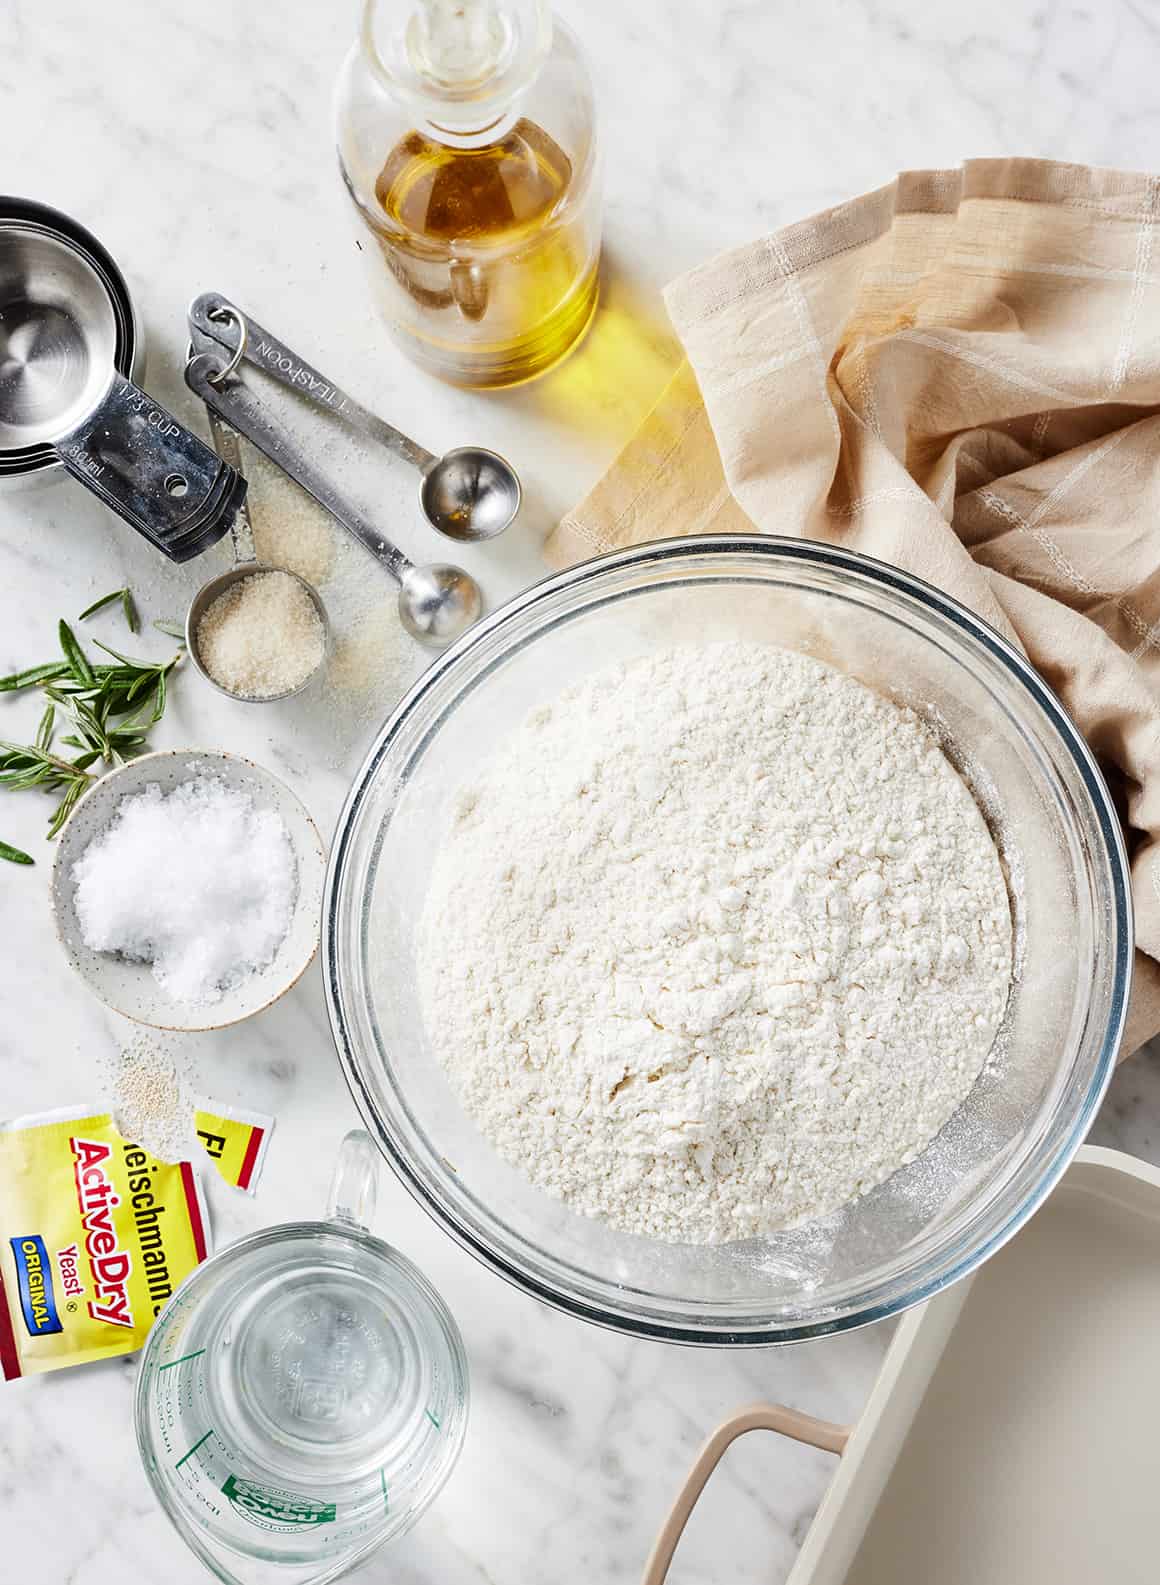
Focaccia Bread Ingredients
Ready to bake? Here’s what you’ll need to make this focaccia bread recipe:
- All-purpose flour – Flour is the main ingredient in this recipe, so measuring it as accurately as you can will serve you well. If you have a kitchen scale, now’s the time to use it! Weighing the flour will give you the most precise measurement. If you don’t have a scale, your next best bet is spooning and leveling the flour to avoid packing too much into your measuring cup.
- Warm water – It hydrates the dough. Heads up: The biggest change we’ve made to this recipe over the years is increasing the ratio of water to flour. The dough is very wet, but this high level of hydration gives the bread a wonderful airy texture inside!
- Active dry yeast or instant yeast – Proof it in the water with a little cane sugar before mixing up the dough.
- Extra-virgin olive oil – It adds rich flavor to the focaccia and makes its edges crisp and golden.
- Fresh rosemary – For topping. Find other topping suggestions below!
- Sea salt – Seasoned bread=flavorful bread. Mix fine sea salt into the focaccia dough. Before baking the loaf, sprinkle flaky salt on top!
Find the complete recipe with measurements below.

How to Make Focaccia Bread
The first step in this focaccia recipe is making the dough. Start by proofing the yeast. In the bowl of a stand mixer fitted with a dough hook, stir together the water and sugar. Stir in the yeast and set aside for 5 minutes, or until foamy. If the yeast doesn’t foam, discard the mixture and start again with new yeast.
When the yeast is foamy, add the flour and salt. Mix on low speed until a shaggy dough forms. Then, increase the speed to medium and mix for 5 minutes. The dough will become very sticky and elastic. It will begin grabbing the sides of the bowl.
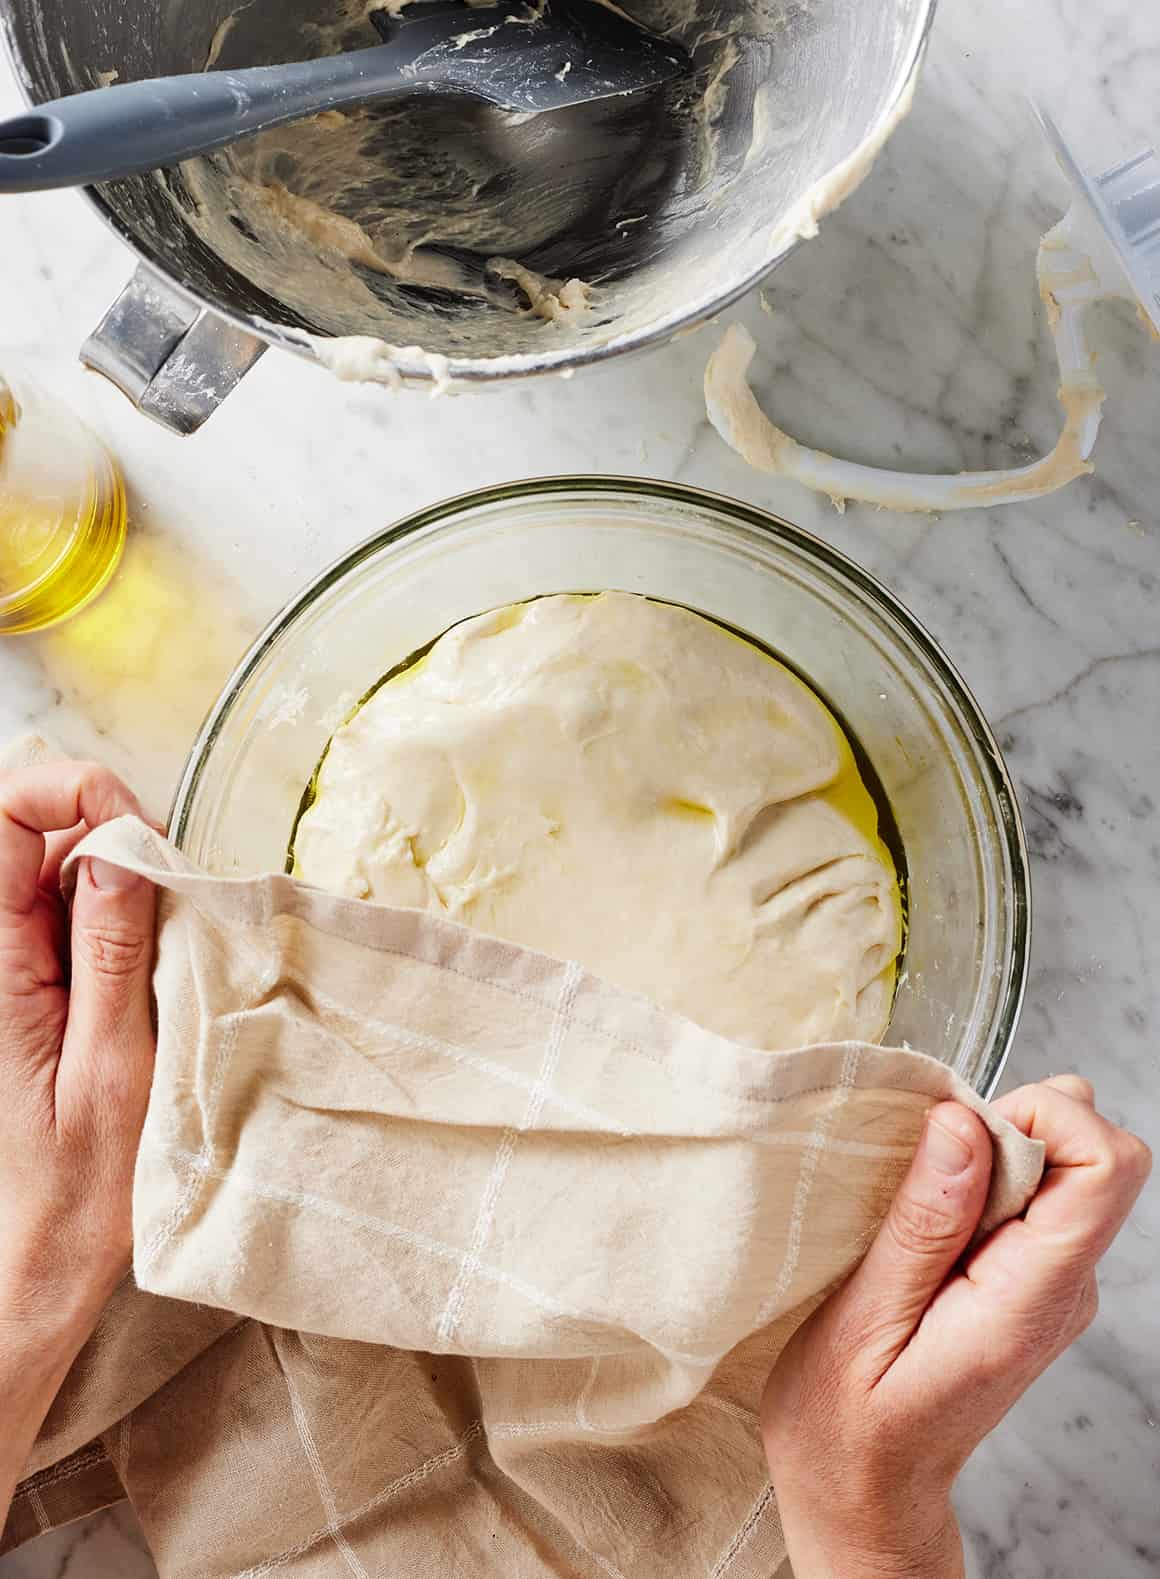
It’s time for the first rise! Brush a large bowl with 2 tablespoons of olive oil. Use a spatula to transfer the dough from the bowl of the stand mixer to the oiled bowl. It will be too sticky to transfer by hand!
Use your fingers to brush any oil that’s pooling around the edges of the dough over its surface. Cover with plastic wrap or a damp towel and set aside to rise until doubled in size, 1 to 1 1/2 hours.

Next, shape the focaccia. Brush a 9×13-inch pan with another 2 tablespoons of olive oil.
Tip
My favorite pan to use for this recipe is a nonstick aluminum 9×13-inch baking pan.
If your pan is not nonstick, I recommend greasing it with butter before adding the oil. It might seem excessive, but it’s essential for preventing the bread from sticking!
Uncover the dough and rub your hands with olive oil. Slide your hand under one edge of the dough and fold it into the center of the bowl. Continue working your way around the edge of the bowl, folding the dough into itself, until you have a rough ball that you can lift from the bowl (see above photo).
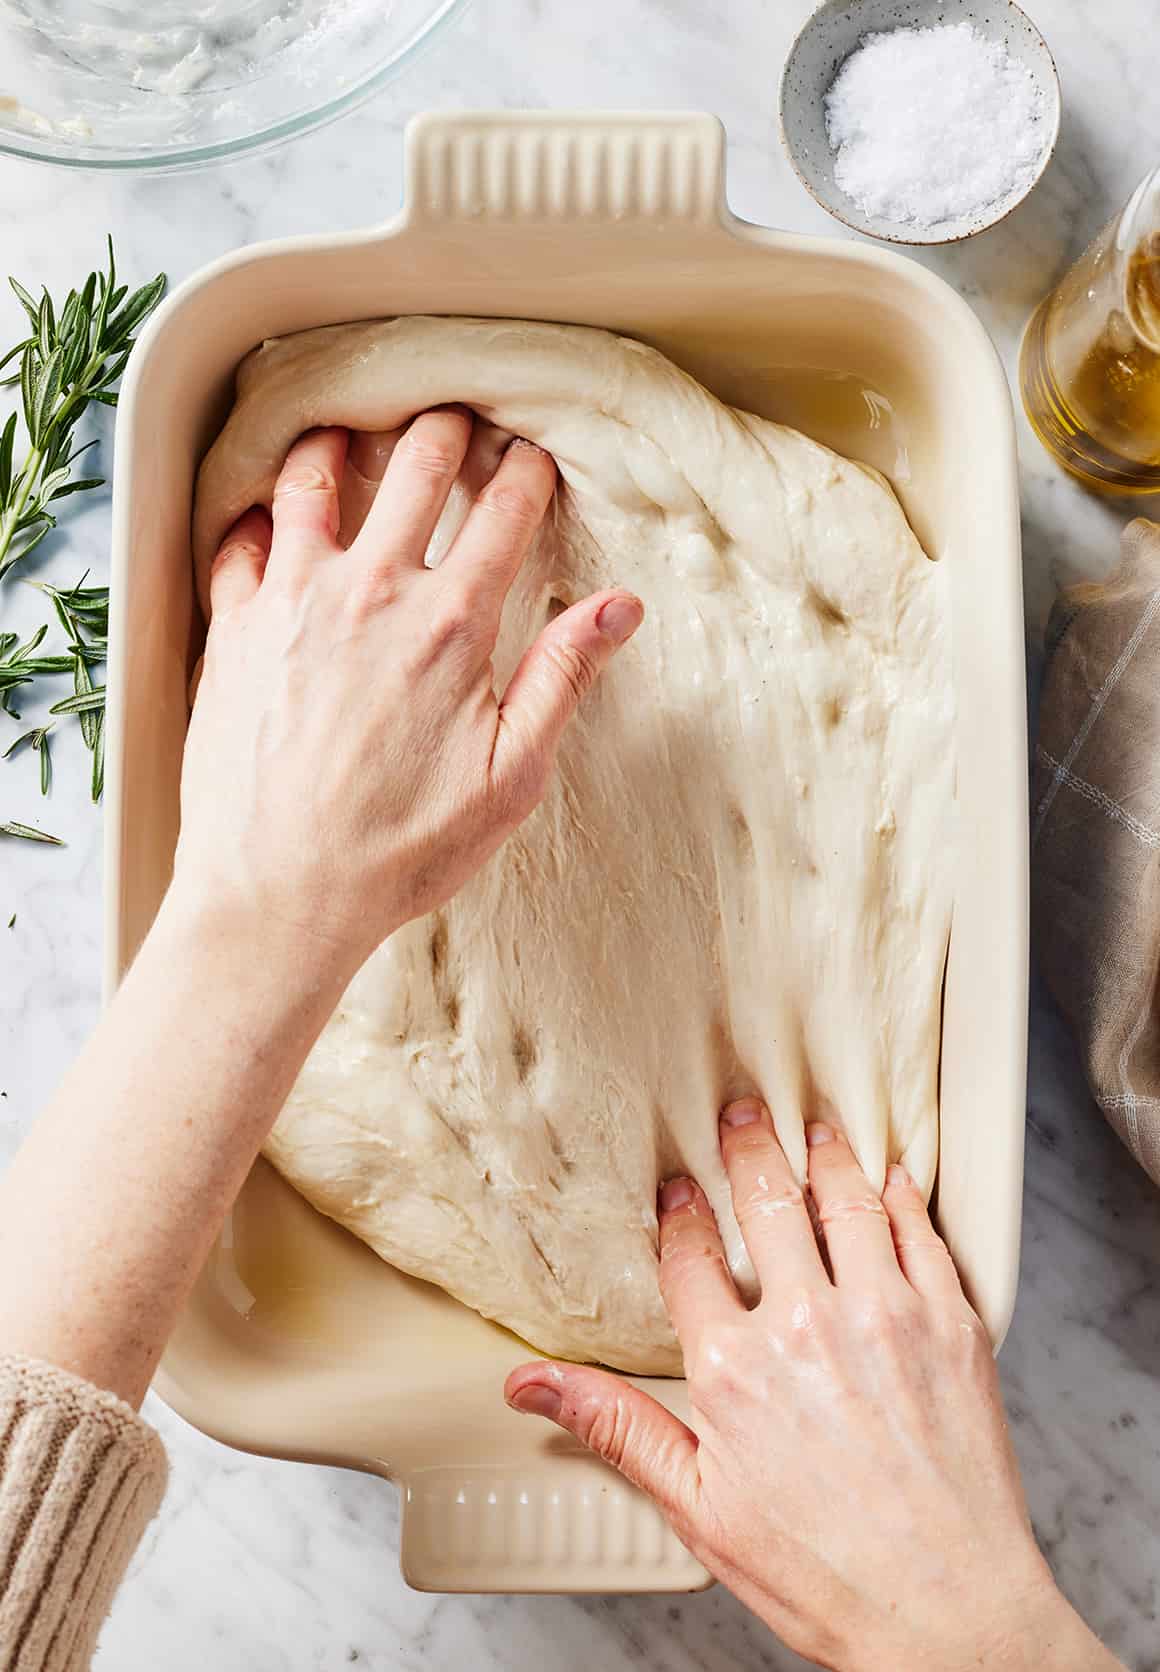
Transfer the dough to the prepared pan and turn to coat it in the oil.
Press the dough to the pan’s edges. Let it relax, and then press it to the edges again.
Let the dough rise for a second (shorter) time. Cover the pan and set it aside for 45 minutes, or until the dough has doubled in size. 30 minutes into this rise, preheat the oven to 425°F.

Dimple the dough. Uncover the focaccia and drizzle 2 more tablespoons of oil on top of the dough. Rub your hands with olive oil and use your fingers to make indentations across the surface of the dough. You don’t have to be gentle here! Press all the way through the dough to the pan. Some air bubbles should pop up in the process. That’s good! They brown beautifully in the oven.
Finally, top and bake. Add your desired toppings (flaky sea salt and rosemary are my go-tos!) and bake until the focaccia is golden brown, 20 minutes to 30 minutes.
Let cool slightly, and then slice and enjoy! You can’t beat warm focaccia bread.
Focaccia Recipe Tips
- Oil your hands. This recipe asks you to oil your hands often. It might seems unnecessary or repetitive, but it makes a HUGE difference. Focaccia dough is wet and sticky, and it will stick to your hands if they’re not oiled, making it really difficult to work with. So, please! Oil your hands liberally. Just think of it as a little extra moisturizer!
- Temperature affects rising time. I’ve given estimated times for each rise in this recipe, but the primary indicator of when to move on to the next step should be the size of the dough. It might take more or less time to double depending on the temperature of the place it’s rising. Generally, the warmer dough is, the faster it rises. If it’s cold, it rises more slowly.
- Freeze the extras. Homemade focaccia is best on the day it’s made, but it will keep well in an airtight container at room temperature for up to 3 days. If you’d like to have it on hand for longer, I recommend freezing it. It thaws and reheats nicely!

Recipe Variations
Most often, I make this recipe as written, topped with flaky sea salt and fresh rosemary. But if you’d like to experiment with other toppings, by all means, do! Any of these would be delicious:
- Sliced olives
- Roasted cherry tomatoes or sun-dried tomatoes
- Fresh thyme
- Caramelized onions
- Roasted garlic
- Thinly sliced Meyer lemon
- Freshly grated Parmesan cheese
Let me know what variations you try!
How to Make Focaccia Sandwiches
This homemade focaccia bread is delicious as a snack and as a side for salads and soups…but it makes great sandwiches too!
Just slice the loaf in half horizontally and fill it with your favorite sandwich fixings.
I love to use it to make these easy Caprese Sandwiches!

More Favorite Bread Recipes
If you love this rosemary focaccia bread, try one of these easy recipes next:
- No-Knead Bread
- Homemade Dinner Rolls
- Garlic Knots
- Homemade Bagels
- Pita Bread
- Or any of these 25 Super Fun Baking Recipes!

Focaccia Bread Recipe
Ingredients
- 1¾ cups warm water, 105° to 115°F
- 2 teaspoons cane sugar
- 1 (¼-ounce) package active dry yeast, 2¼ teaspoons
- 500 grams all-purpose flour, 4 cups
- 2 teaspoons sea salt
- 6 tablespoons extra-virgin olive oil, plus more for your hands
- Flaky sea salt, optional, for sprinkling
- Chopped fresh rosemary, optional, for sprinkling
Instructions
- In the bowl of a stand mixer fitted with a dough hook, stir together the water and sugar. Sprinkle the yeast on top and stir again. Set aside for 5 minutes, or until the yeast is foamy. If the yeast doesn’t foam, discard the mixture and start again with new yeast.
- Add the flour and salt and mix on low speed until a shaggy dough forms. Increase the speed to medium and mix for 5 minutes. A very elastic, sticky dough should form and begin grabbing the sides of the bowl.
- Brush a large bowl with 2 tablespoons of the olive oil. Transfer the dough to the bowl, using a spatula to scrape it out of the bowl of the stand mixer. It will be too sticky to transfer by hand. Use your fingers to lightly brush any oil that’s pooling at the edges of the dough over its surface. Cover the bowl with plastic wrap or a damp towel and set aside until the dough has doubled in size, 1 to 1½ hours.
- Brush a 9x13-inch baking dish* with another 2 tablespoons of the olive oil. Uncover the dough and rub your hands with olive oil. As best you can, slide your hand under one edge of the dough and fold it into itself. Continue working your way around the edge of the bowl, folding the dough into itself, until you have a rough ball that you can lift from the bowl.
- Transfer the dough to the prepared pan and turn to coat in the oil. Press the dough to the pan’s edges. Let it relax and pull away from the edges, then press it to the edges again. Cover the pan with plastic wrap or a damp towel and set aside to rise until the dough has doubled in size, about 45 minutes. 30 minutes into this rise, preheat the oven to 425°F.
- Remove the plastic wrap and drizzle the remaining 2 tablespoons olive oil over the dough. Rub your hands with olive oil, then use your fingers to make indentations across the surface of the dough, pressing through the dough to the pan. Sprinkle with flaky sea salt and rosemary, if desired. Bake for 20 to 30 minutes, or until golden brown.
Notes


I took followed the recipe but found it not as loose as the video.
, perhaps more water. Will wait to see how things turn out.
Made this on a rainy summer day and it was devoured! Wonderful recipe, and a successful first focaccia!
Hi Suzy, congrats on your first focaccia! So glad you loved it!
This focaccia is to die for!!! Love it!
So glad you love it, Amy!
As always this recipe is simple and amazing !!
So glad you love it, Shan!
This was my first time ever making focaccia and all I can say is WOW! I loved how simple it was and the end result was fantastic!
I used this recipe to make both a cheese and an apple cinnamon loaf and both are wonderful. Definitely recommend this recipe to anyone wanting to make focaccia!
I’m so glad you loved it, Olivia!
This is my go to recipe now. I’ve made it a few times. Turns out really nice everytime when following the exact instructions.
Folks who are saying it’s dry might need to use a little less flour next time and when rising bread you wanna put it somewhere warm. My 12 year old son also made this exact recipe and we devoured it with beef stew.
I top it with flakey sea salt and fresh thyme.
Hi Zabrina, I’m so glad you love the recipe!