

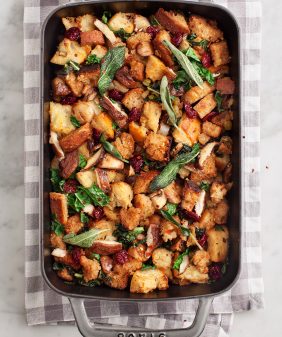
Try these homemade dinner rolls once, and you'll make them forever! Flaky, soft, and buttery, they're an easy, delicious addition to any meal.


These homemade dinner rolls are a perfect addition to almost any meal. Flaky, soft, and buttery, they’re delicious alongside a humble bowl of soup or a full spread of Thanksgiving recipes. We even love them on their own with honey butter or jam!
My husband Jack started making these dinner rolls several years ago, and they’ve been a fixture in our rotation ever since.
We keep coming back to them because they’re so simple. You only need 7 basic ingredients to make this dinner roll recipe! If you’re new to baking, don’t worry. You can totally pull off these pillowy, golden brown rolls!
Jack’s making them for Thanksgiving this year, and I hope you will too. These soft dinner rolls are easy and delicious—I think you’re going to love them!
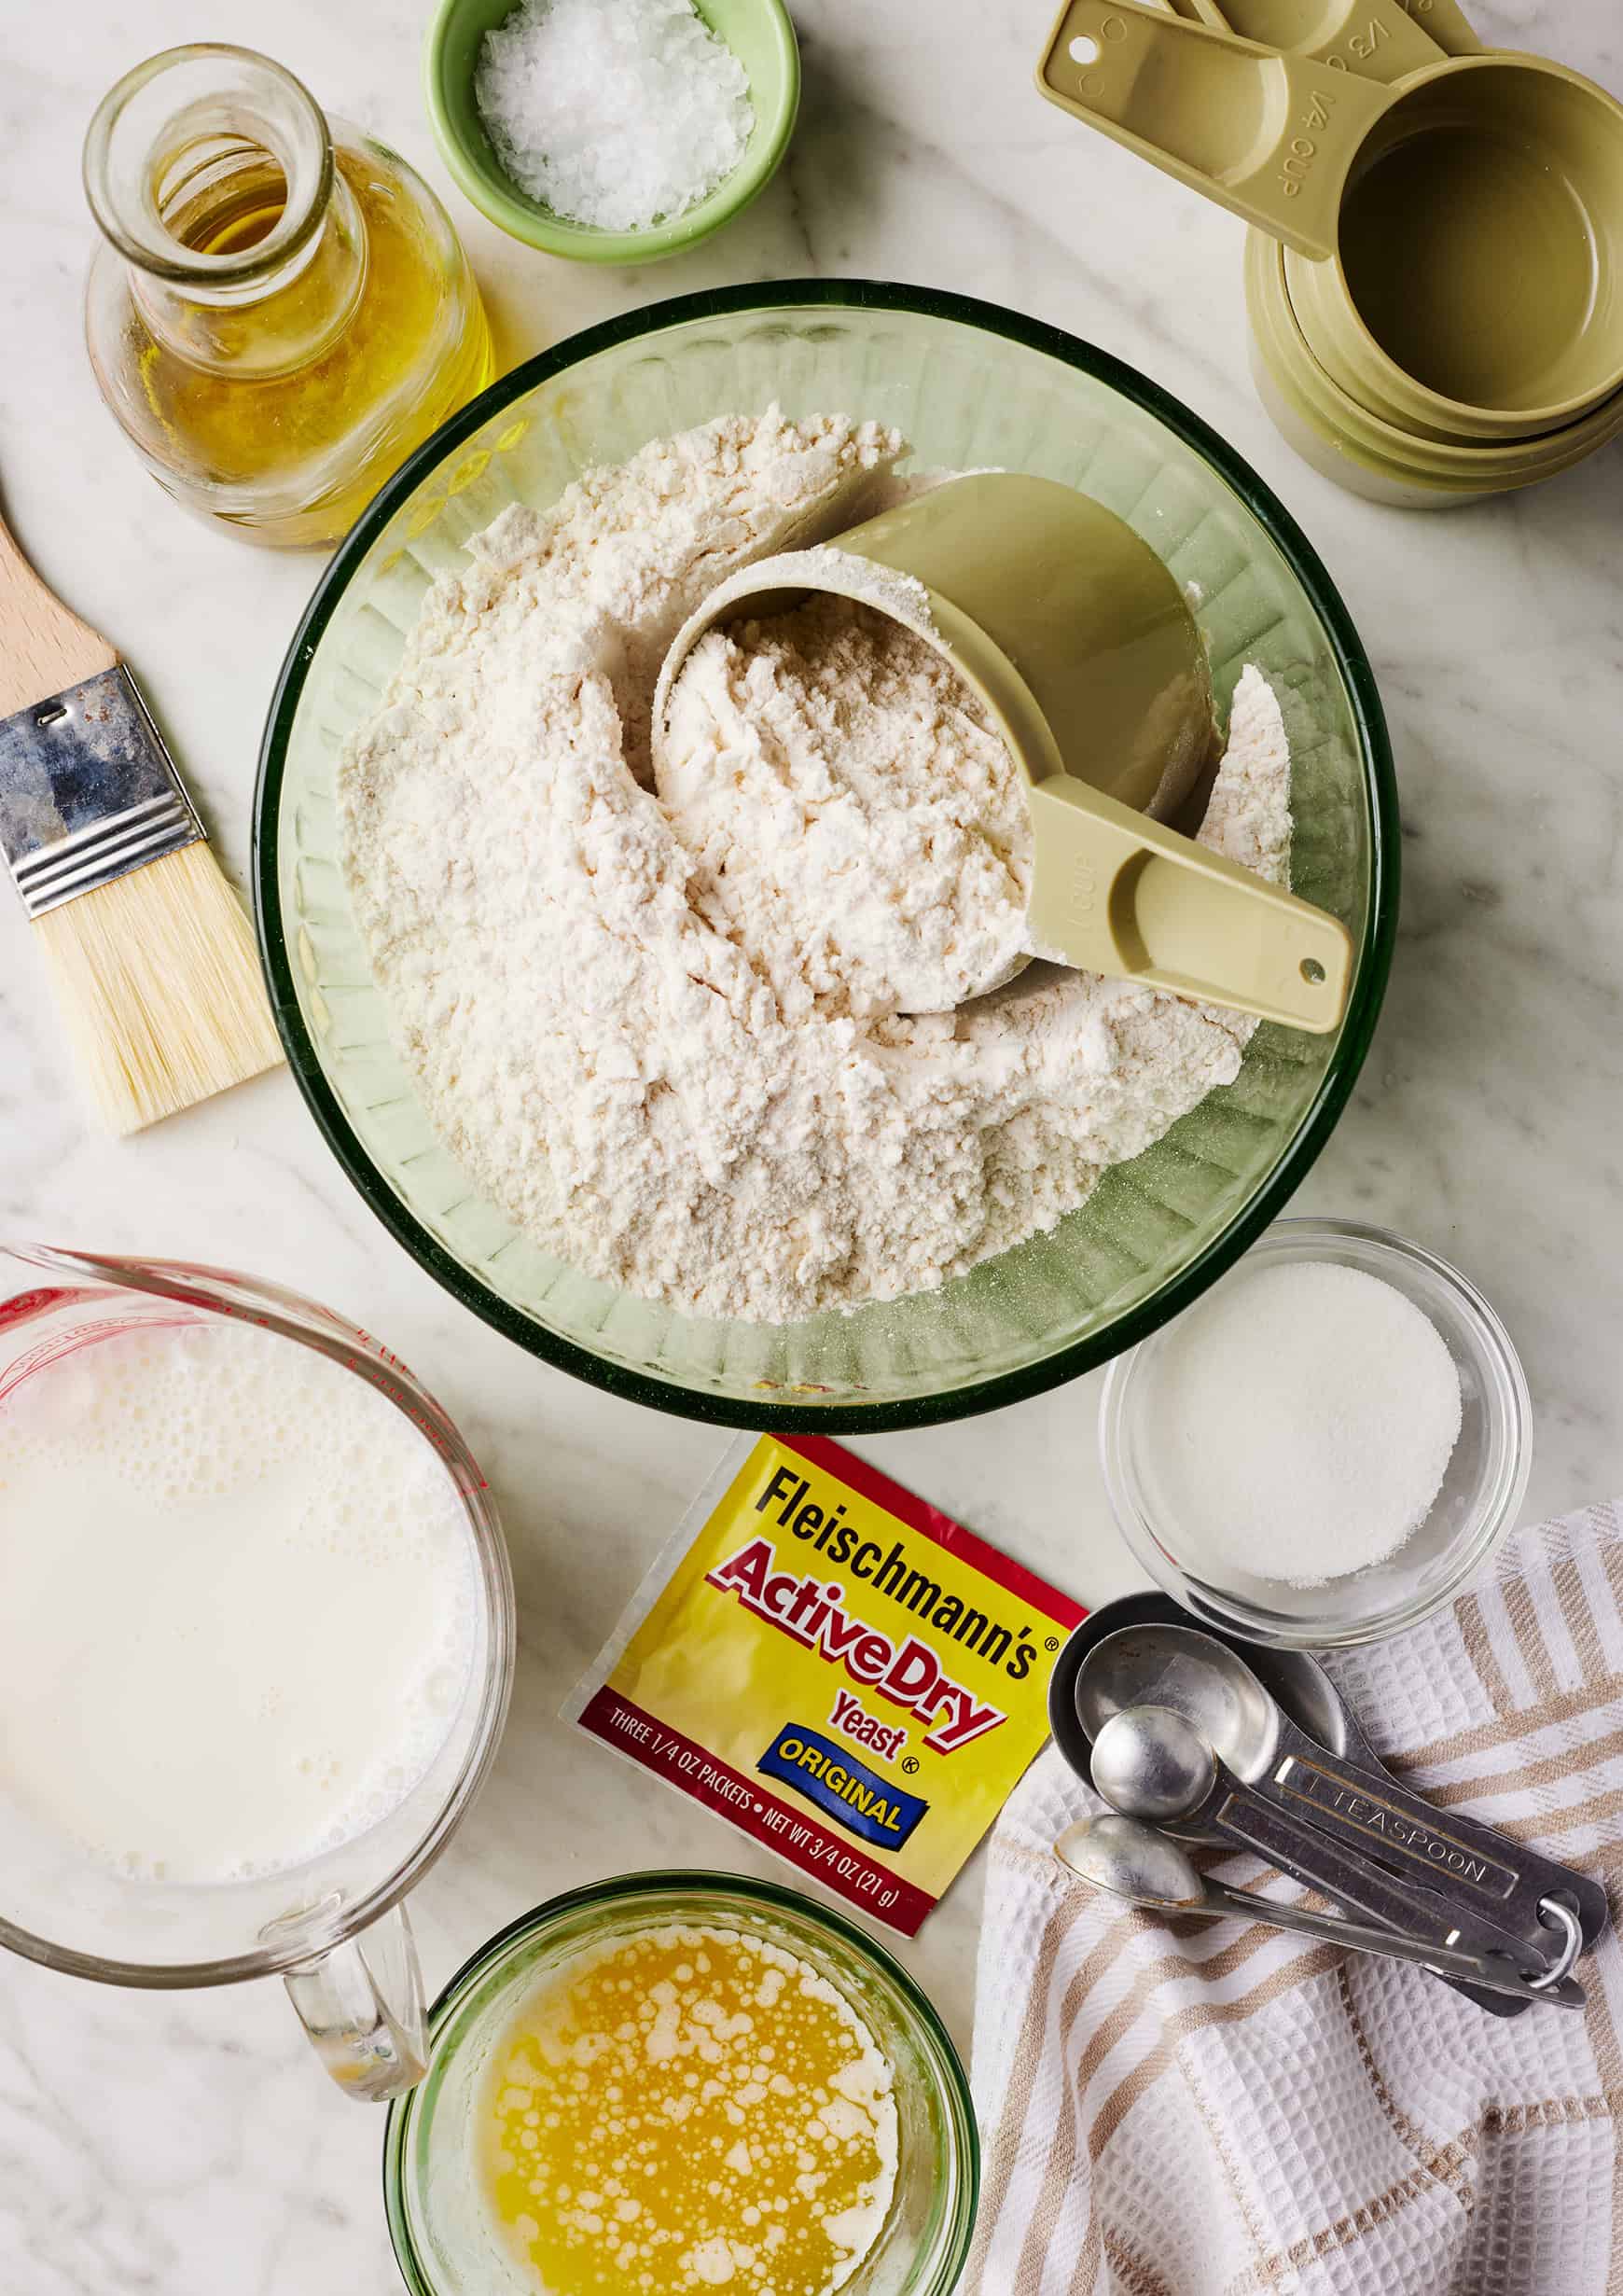
Dinner Roll Recipe Ingredients
You only need 7 ingredients to make this recipe:
- All-purpose flour – One of my best tips for making this dinner rolls recipe is to measure your flour carefully. If you have a kitchen scale, weigh it. If you don’t, spoon and level your flour instead of scooping it up with your measuring cup. You don’t want to accidentally add too much flour to the dough!
- Yeast – We typically use active dry yeast, but instant yeast will work here too. I still recommend proofing it with the milk and sugar before mixing up the dough.
- Milk – Any kind you like! Whole milk adds richness to the dough, which gives the rolls an especially soft and fluffy texture. That said, we’ve had great results with almond milk too.
- Sugar – It activates the yeast and gives the rolls a touch of sweetness.
- Melted butter – You’ll add some to the dough and brush more on top of the rolls.
- And sea salt – To round out the sweet and savory flavor.
You’ll also need olive oil for brushing. It prevents the dough from sticking to the bowl and baking sheet!
Find the complete recipe with measurements below.
Variation
Make the rolls vegan. Use your favorite non-dairy milk and vegan butter. Omit the salt if your vegan butter is salted.
How to Make Homemade Dinner Rolls
You can find the complete dinner rolls recipe with measurements at the bottom of this post. For now, here’s a step-by-step overview of how it goes:
First, proof the yeast. Combine it with the warm milk and 1 tablespoon sugar, and let it sit for 5 minutes. After 5 minutes, the yeast should be foamy. If it’s not, discard the mixture and start again. There’s a good chance your yeast wasn’t fresh!
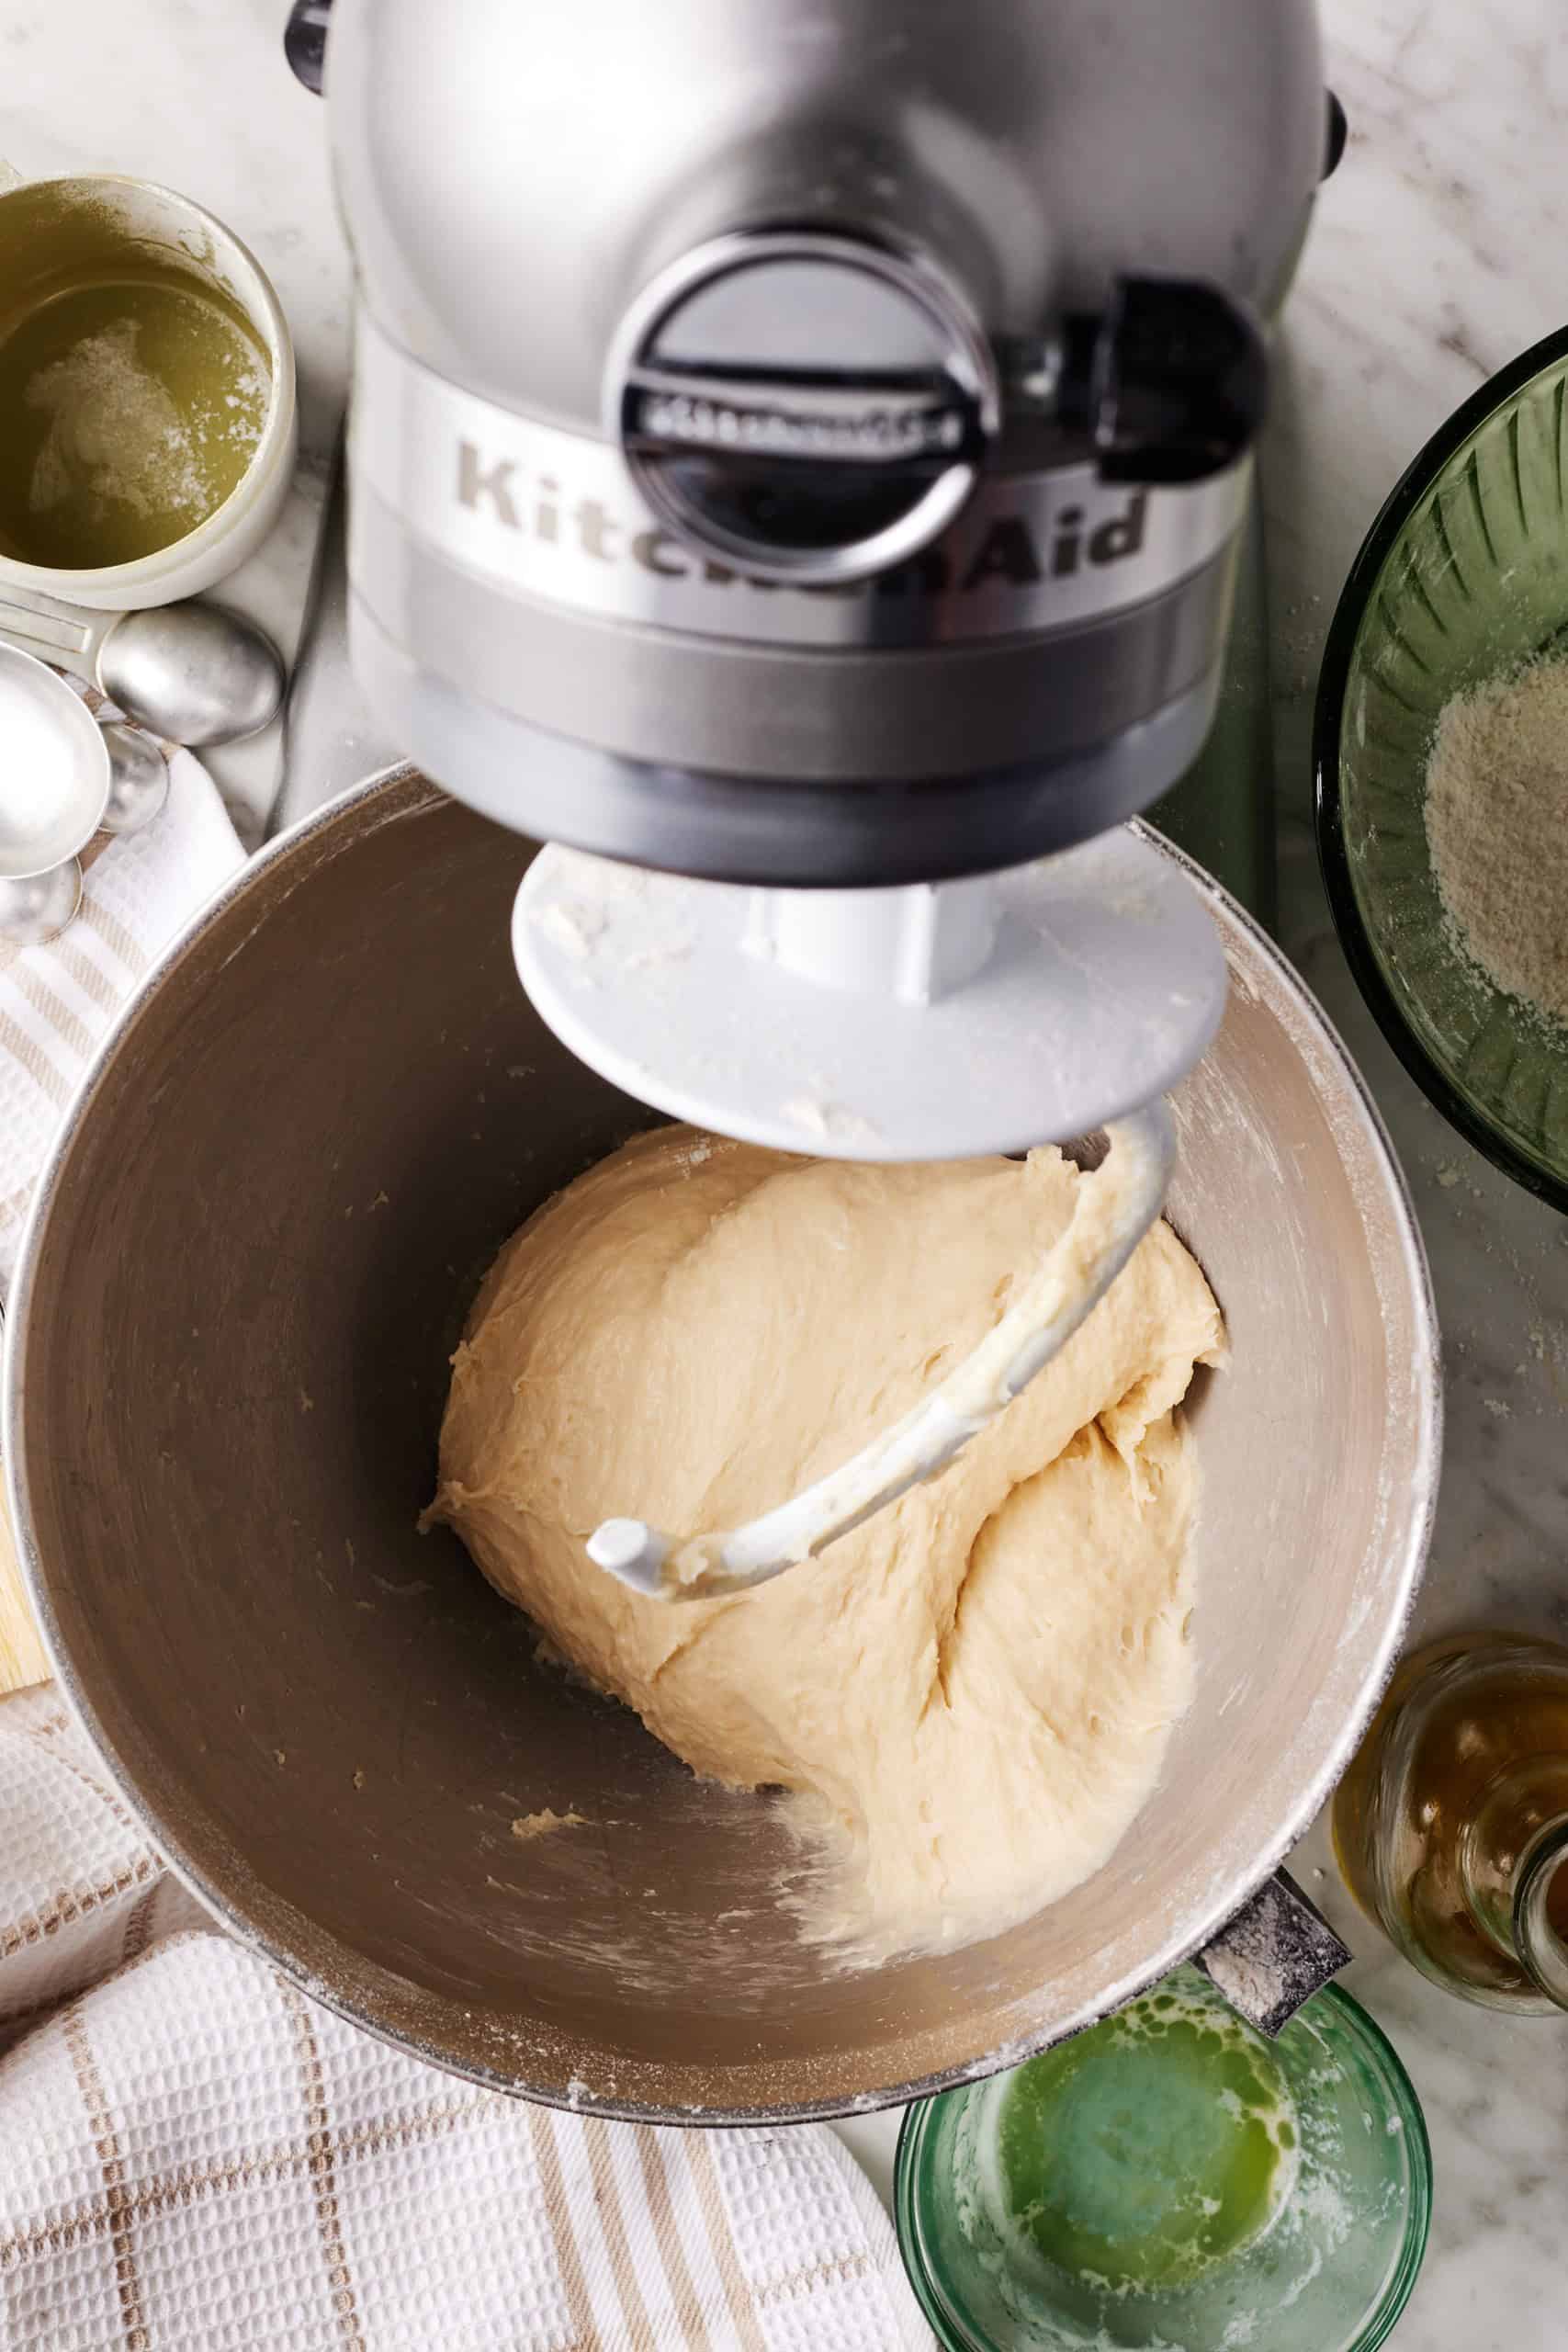
Next, make the dough. Add the foamy yeast mixture, the remaining sugar, melted butter, and salt to the bowl of a stand mixer fitted with a dough hook. Mix on low speed to combine.
Add the flour 1 cup at a time, mixing after each addition. Increase the speed to medium and mix until a cohesive, sticky dough forms around the hook, about 2 minutes. It should be pulling away from the bottom and slapping the sides of the bowl.
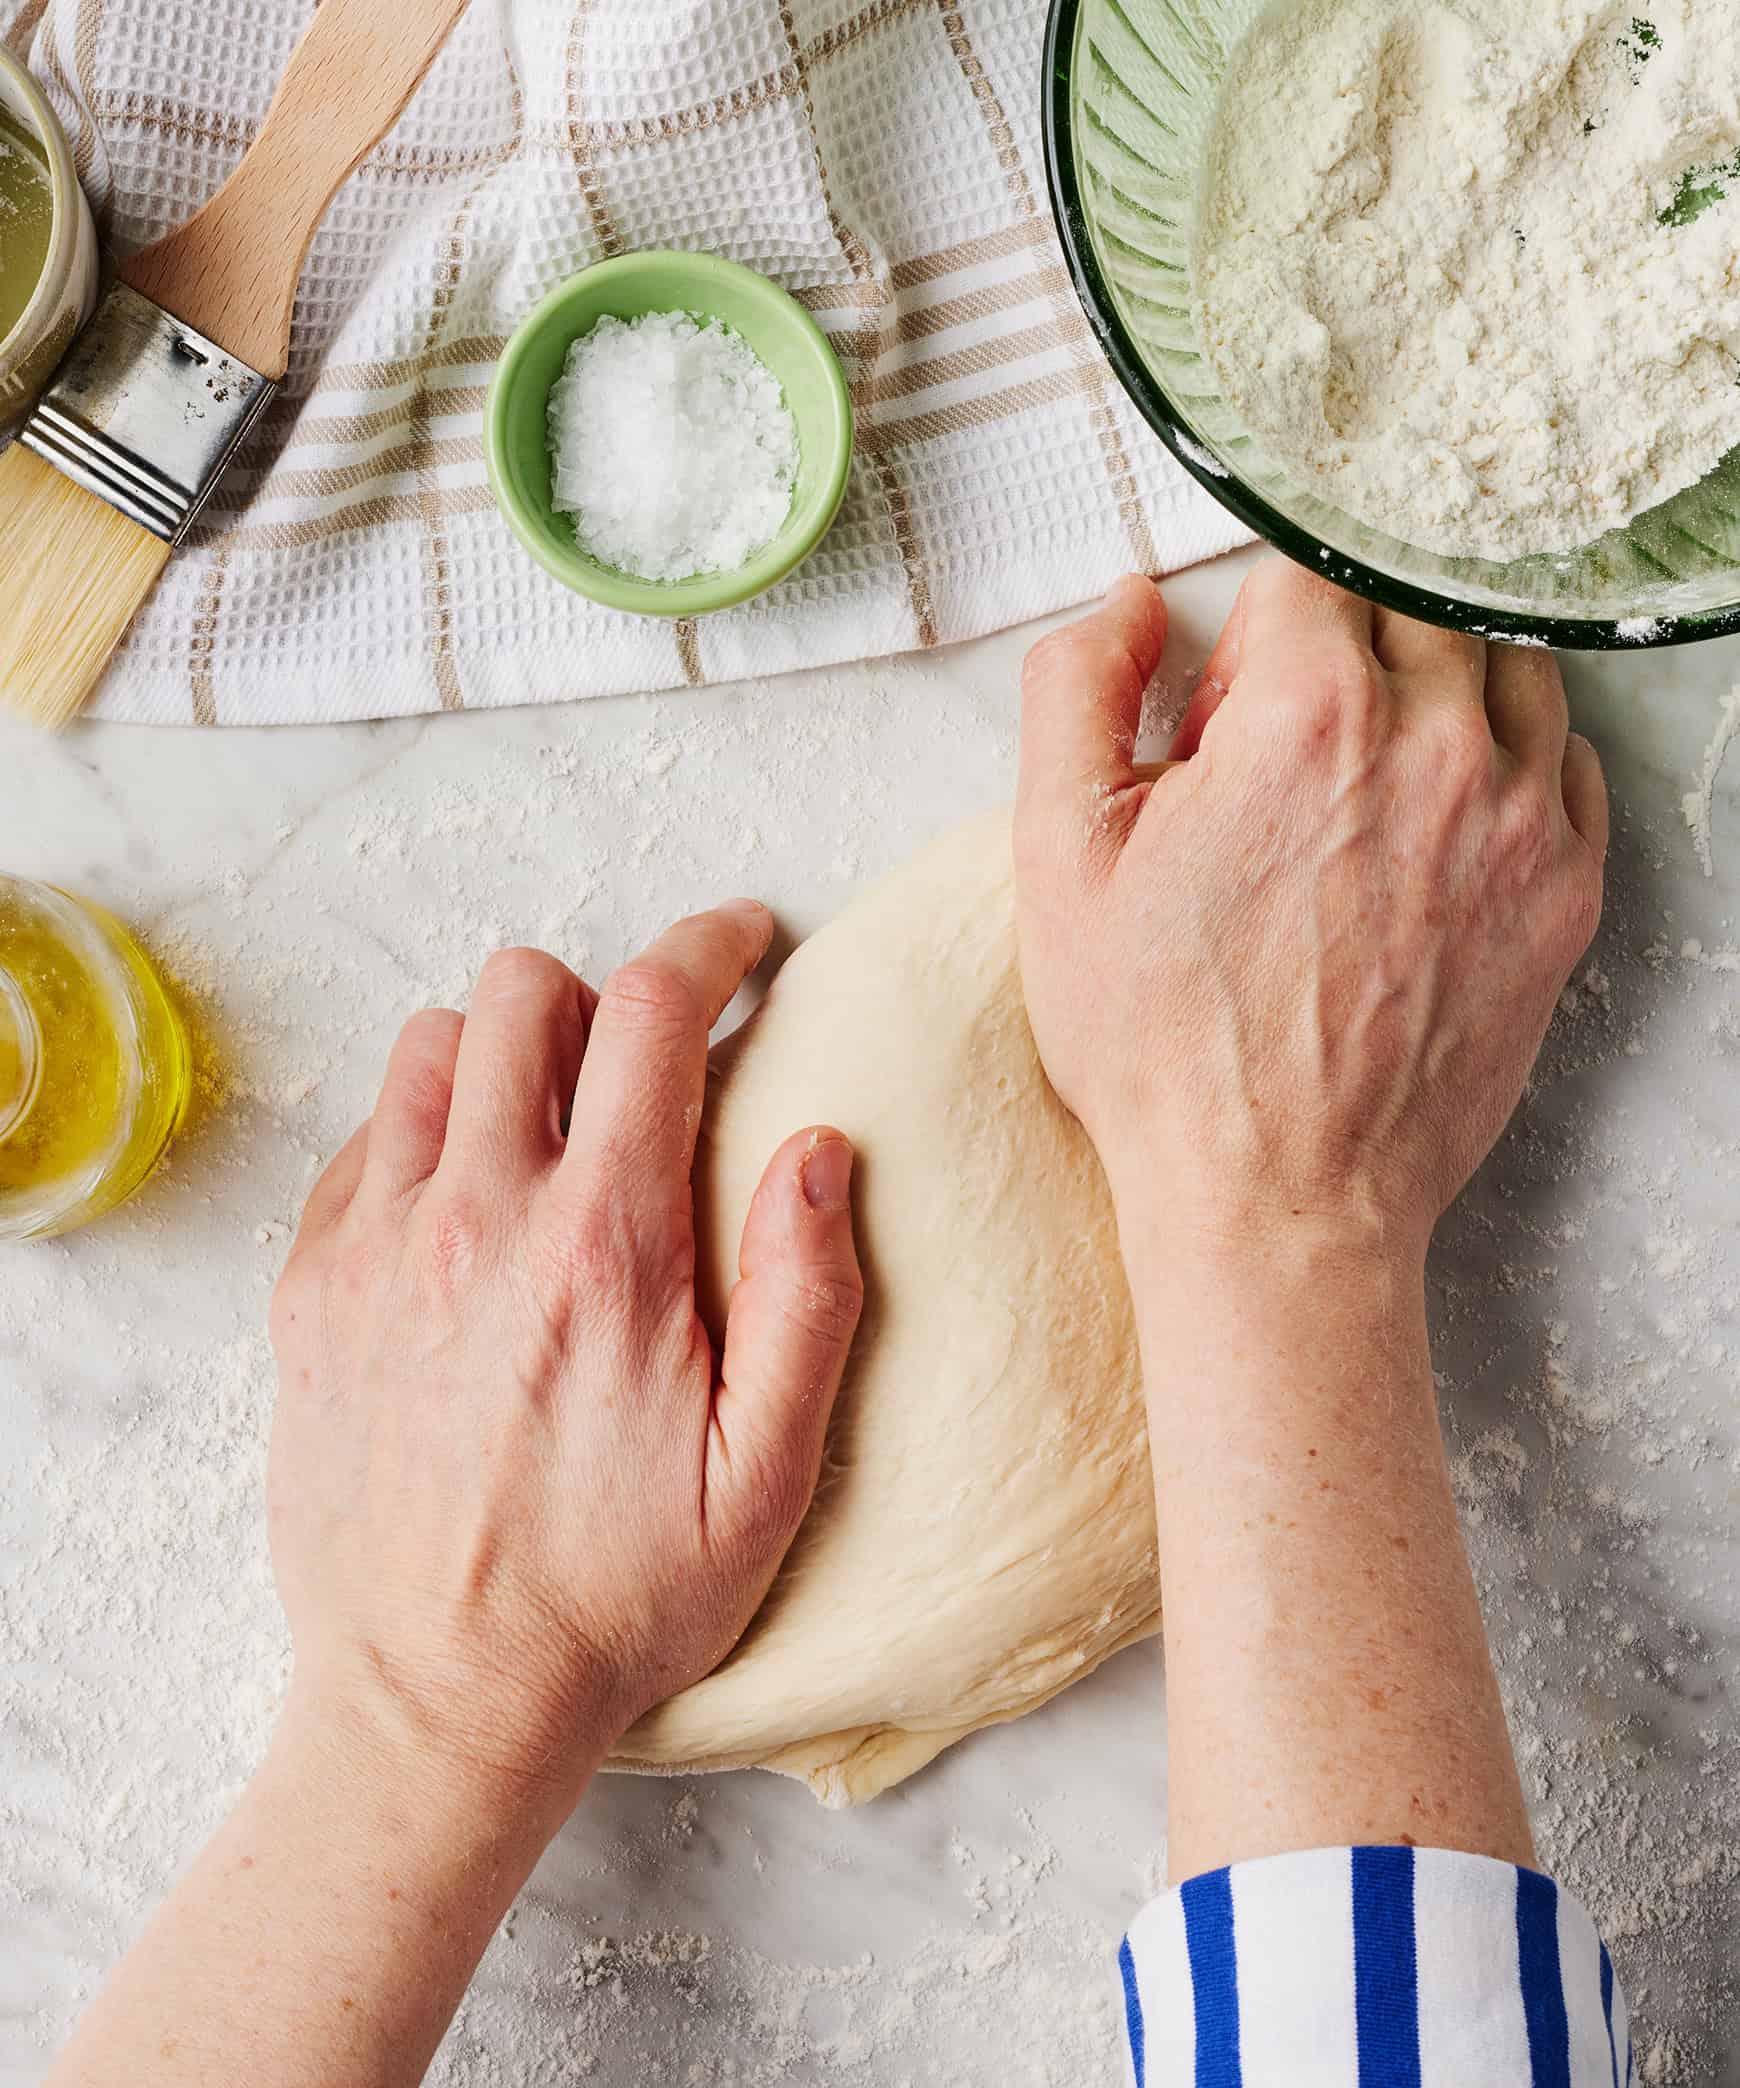
Transfer the dough to a floured work surface, and knead a few times to form it into a ball.
Then, rise! Place the dough ball in an oiled bowl. Cover the bowl with plastic wrap. Let the dough rise for 1 to 2 hours, or until it doubles in size.
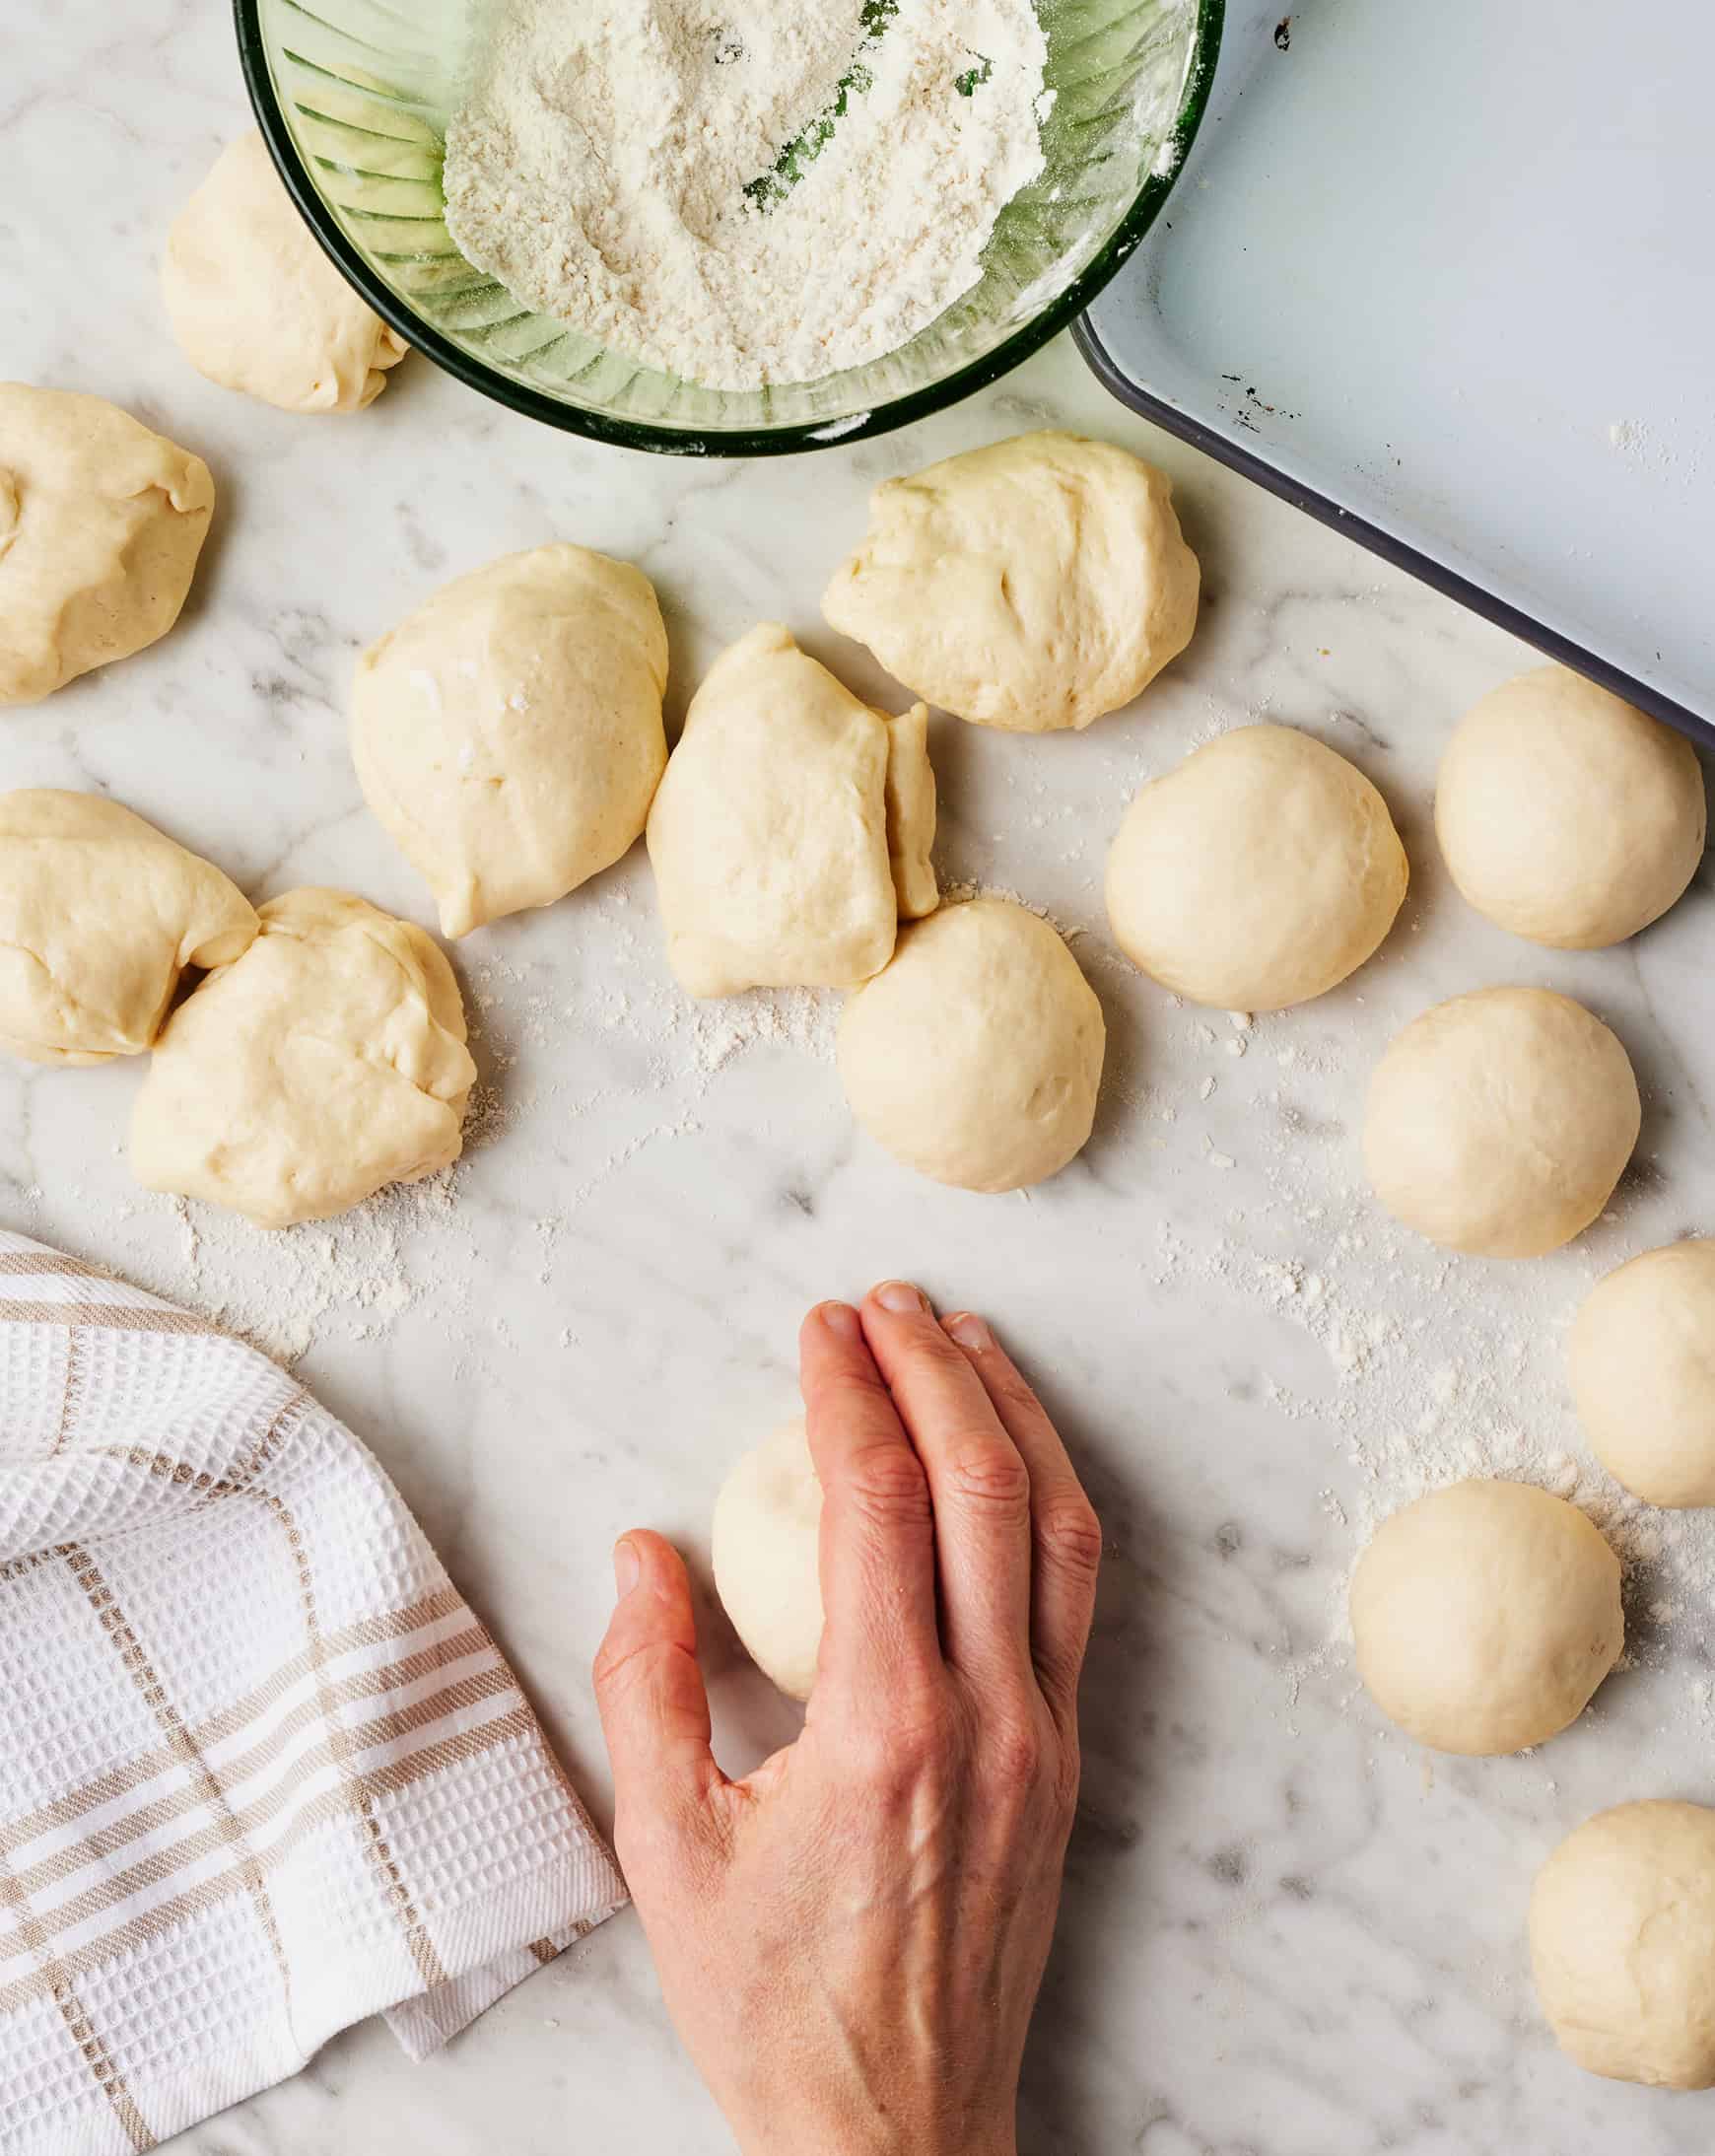
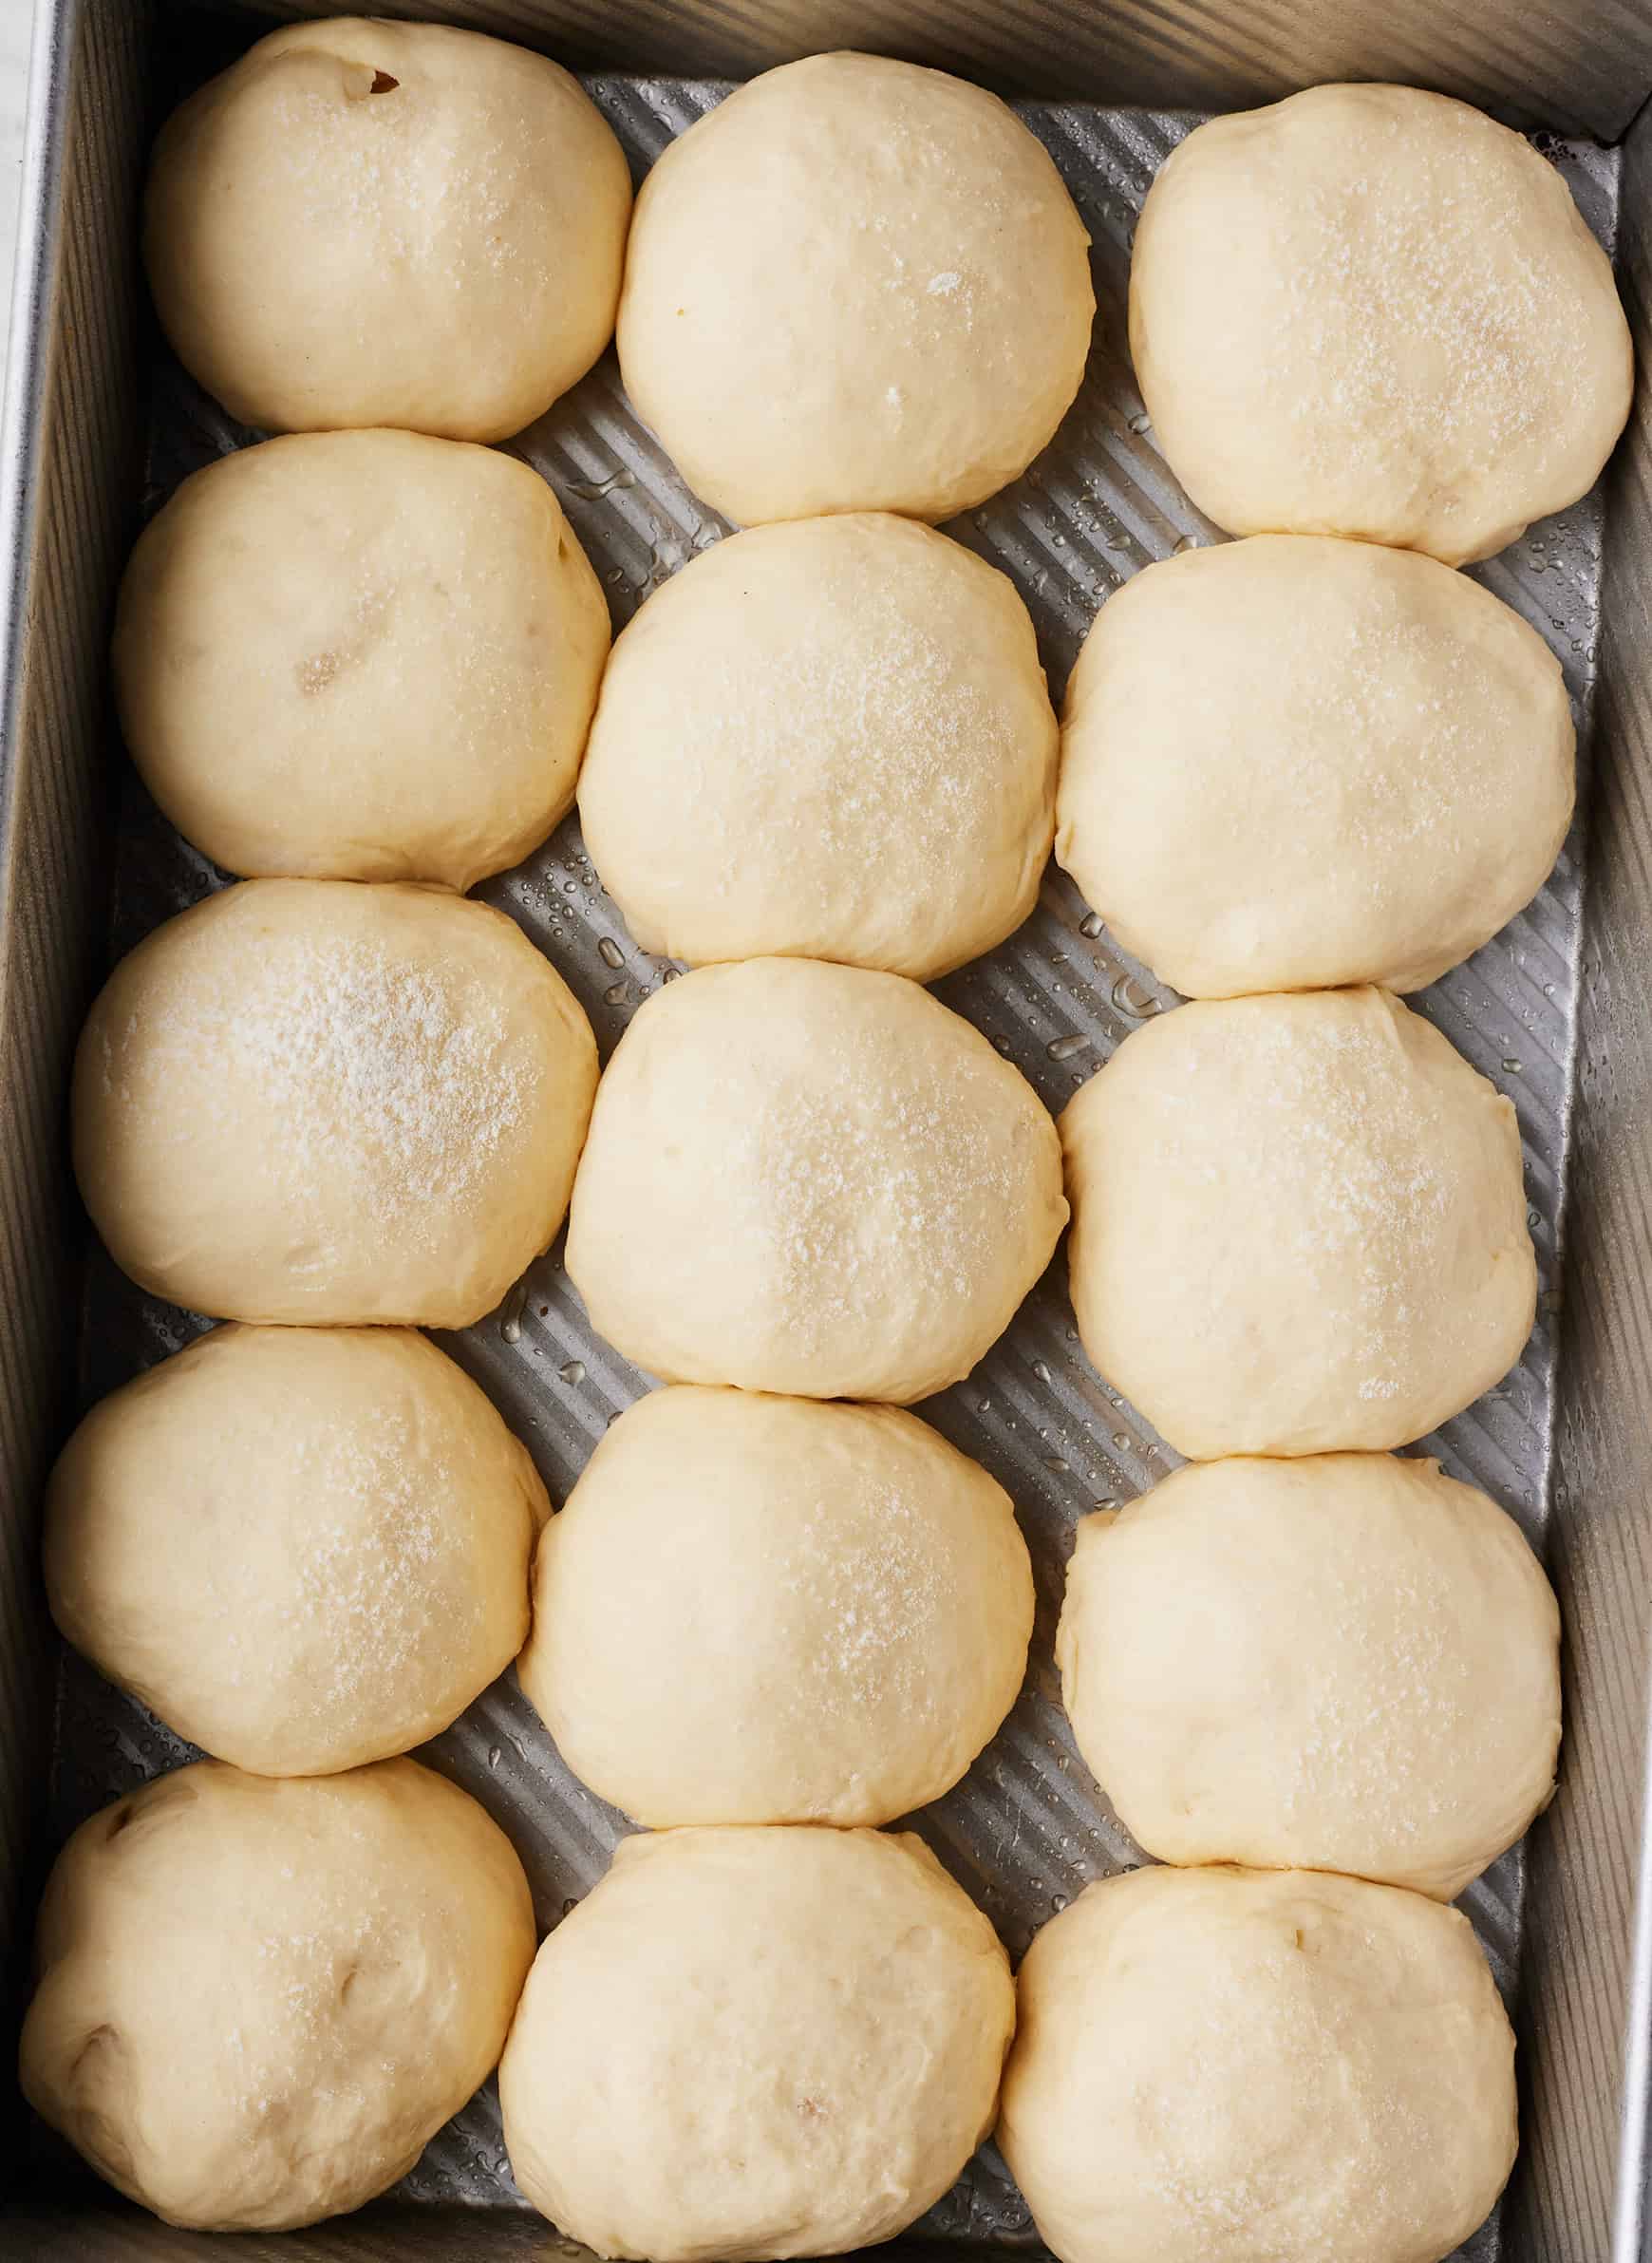
After the dough rises, shape the rolls. Divide the dough into 15 equal pieces, and shape each one into a ball by rolling it on the counter under your cupped hand. Transfer the balls to a greased quarter sheet pan or 9×13-inch baking dish. Dust with flour, cover with plastic wrap, and let rise for another hour, or until puffy.
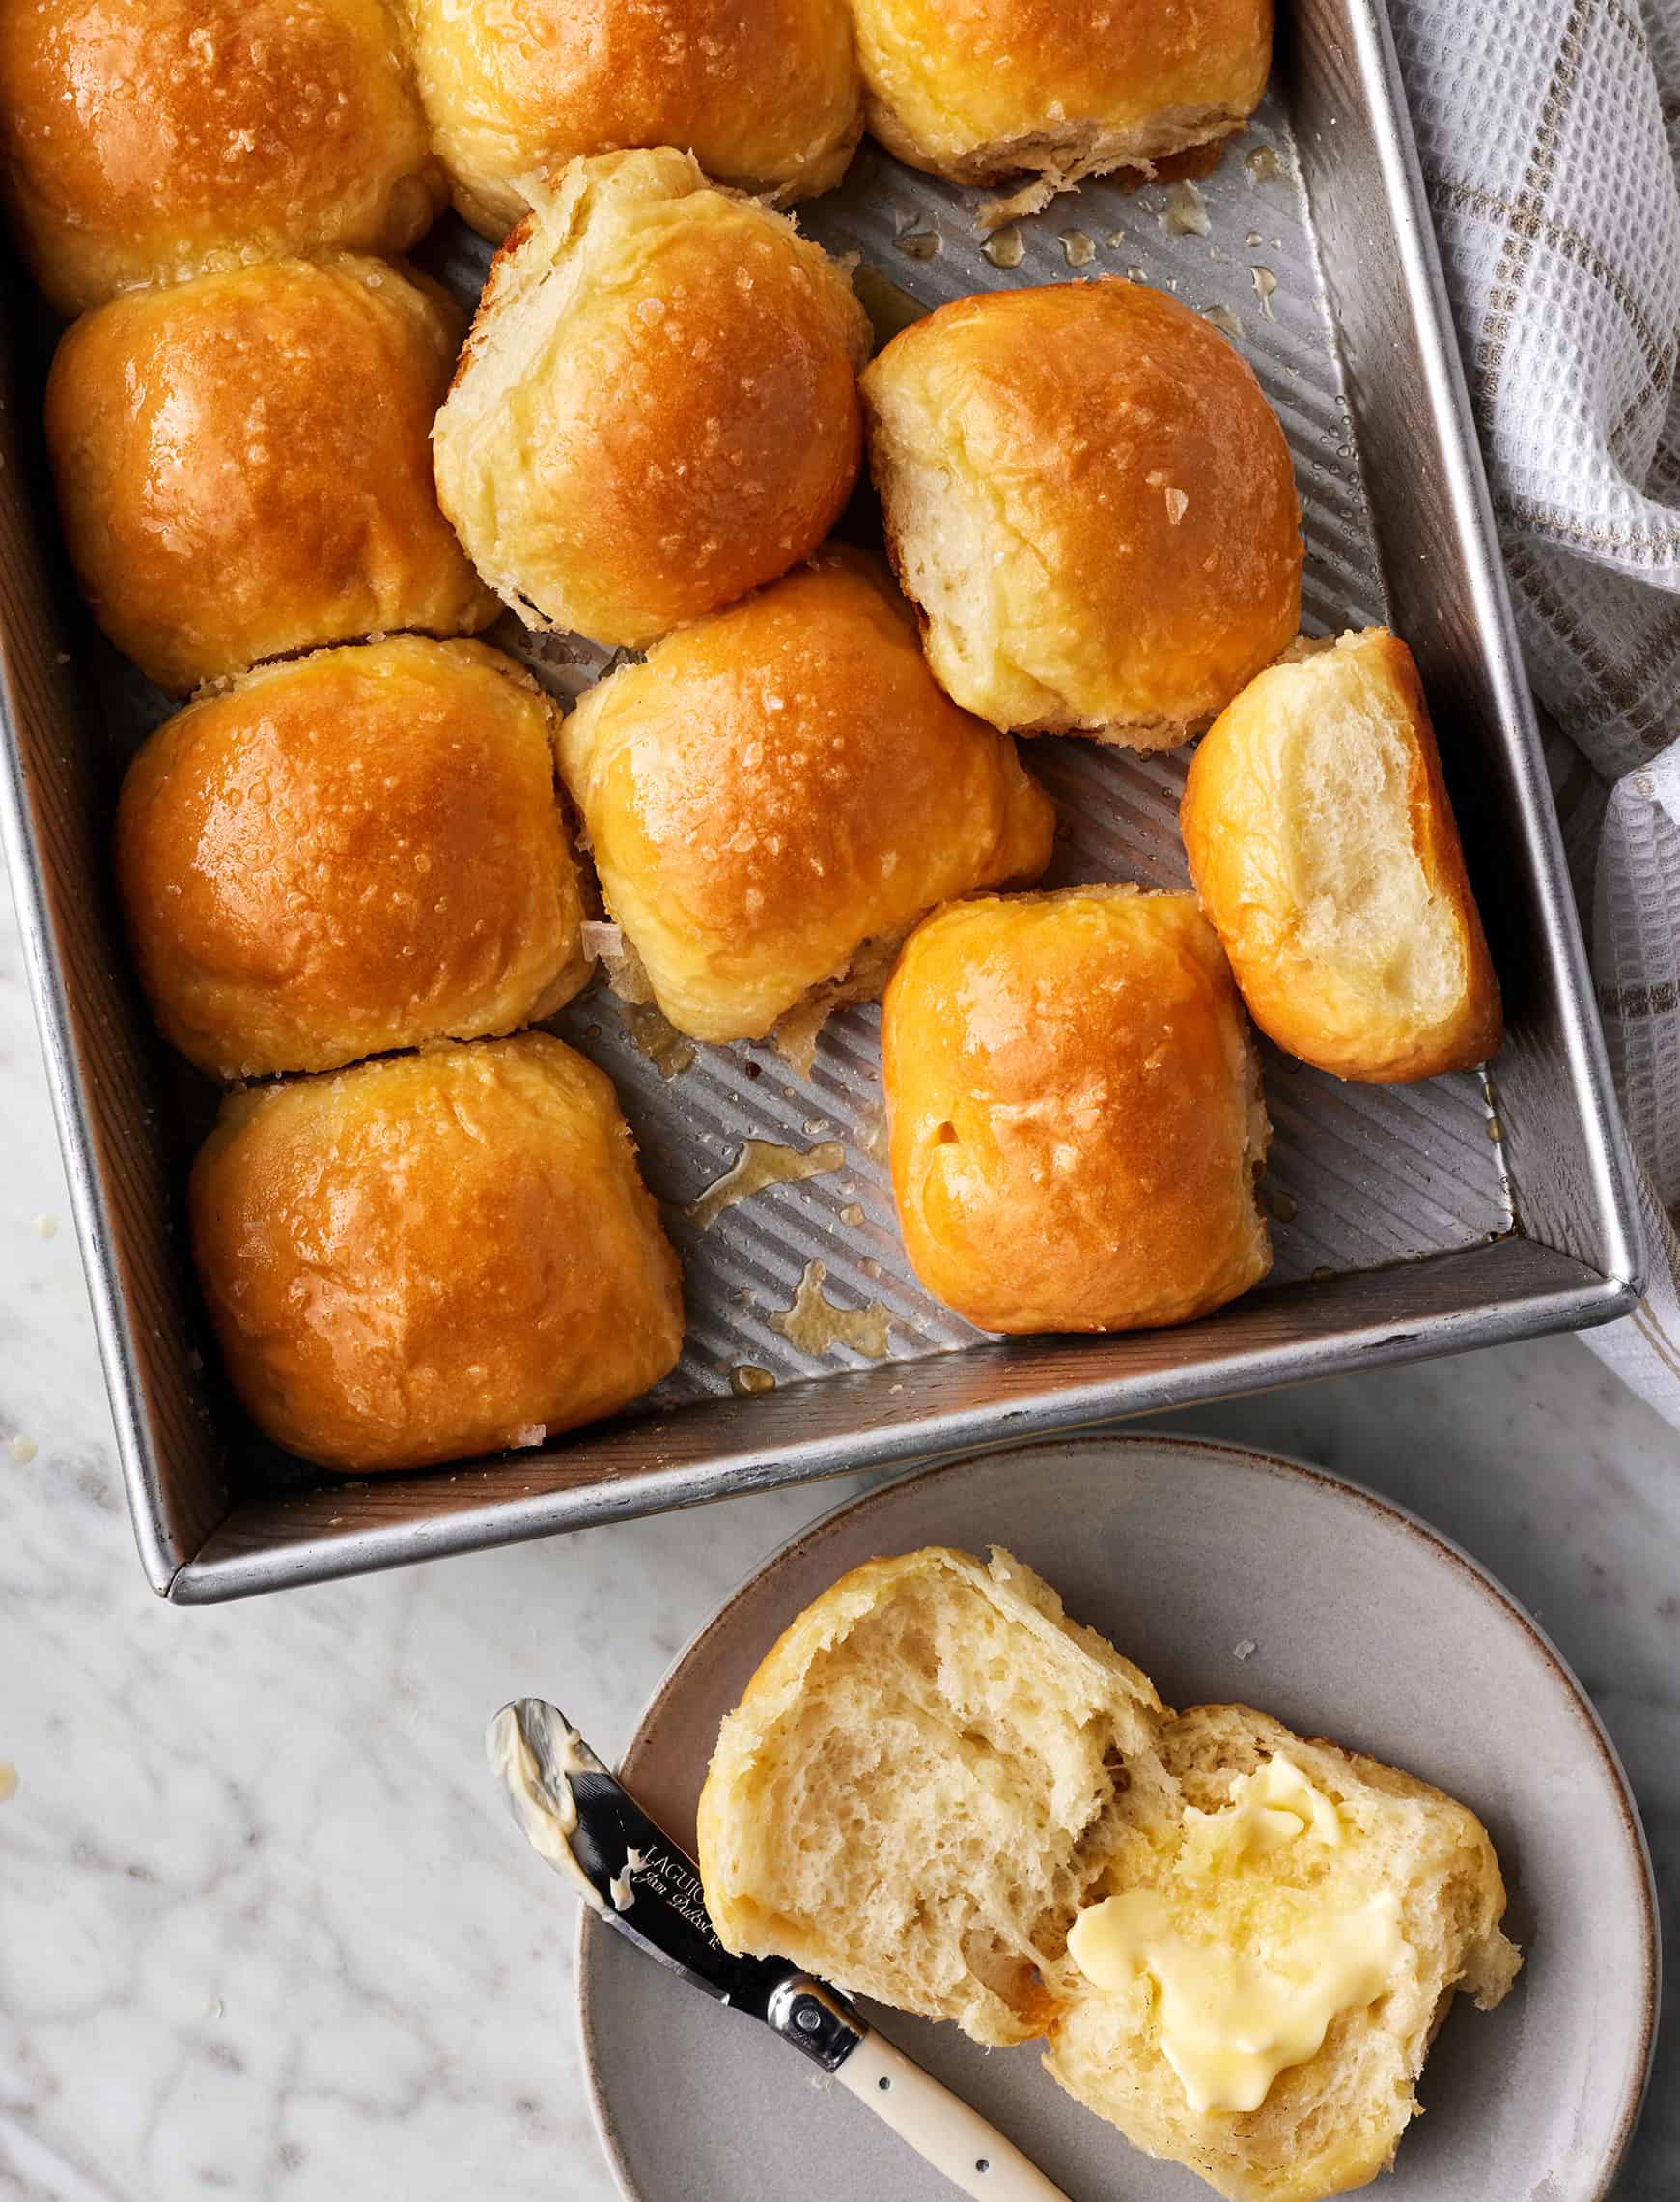
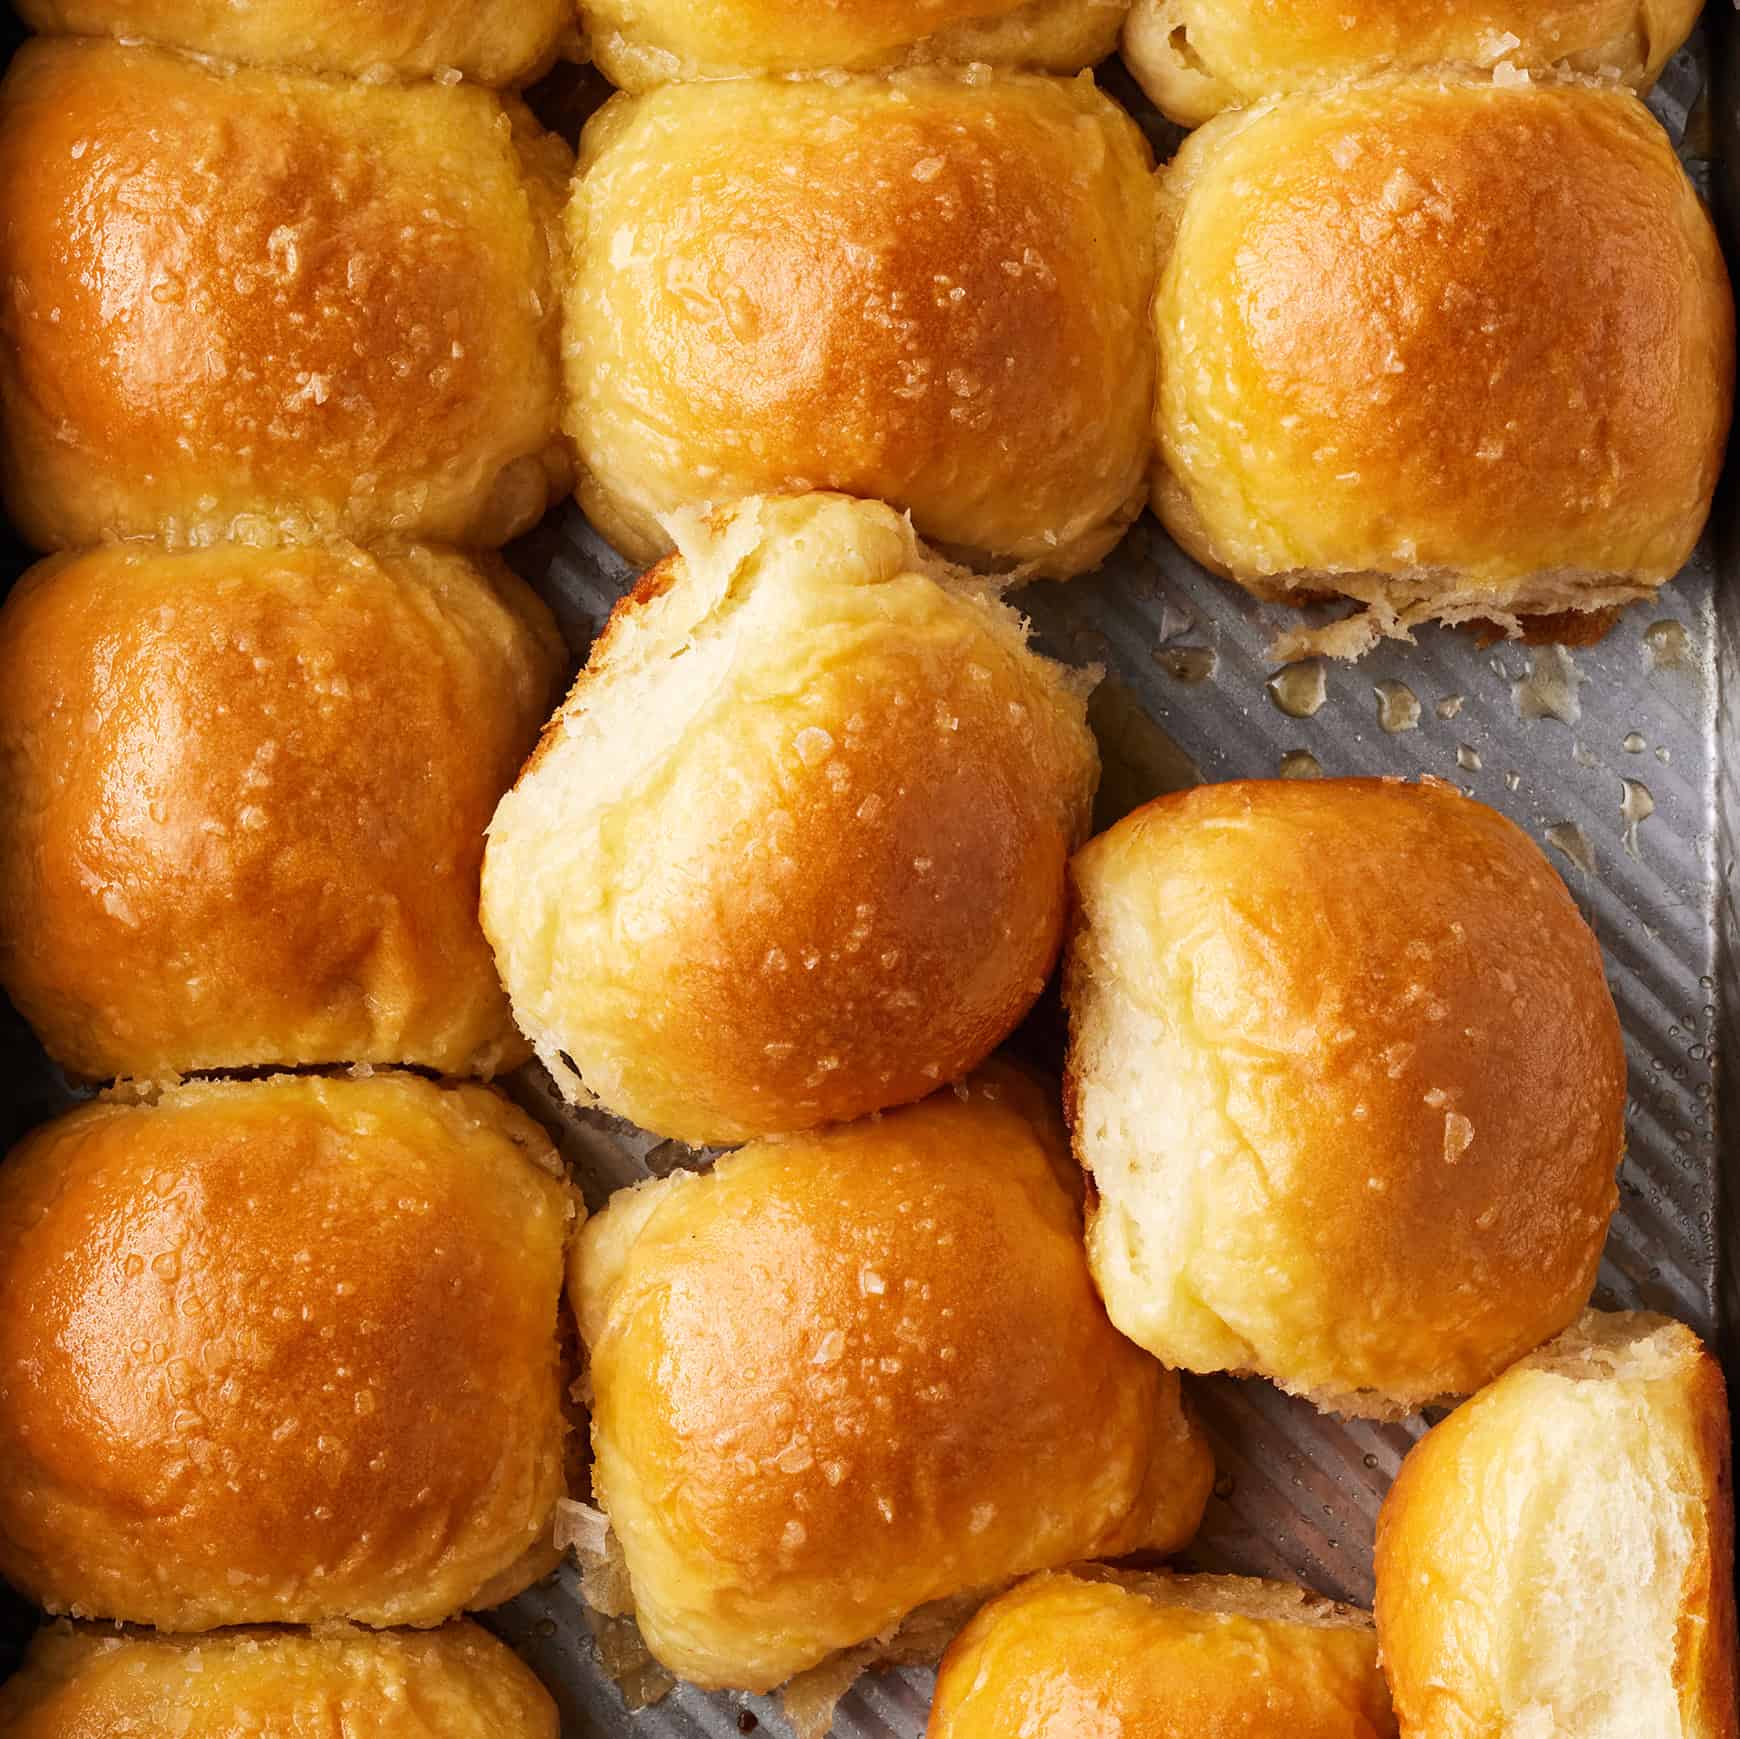
When the rolls are puffy, it’s time to bake! Place them on a low rack in a 350°F oven. Bake for 20 to 25 minutes, or until golden brown. Rotate the pan halfway through the bake time so that the rolls cook evenly.
Brush the warm rolls with butter. Serve immediately!
Tips for Making Homemade Dinner Rolls
- Make sure your yeast isn’t expired. Dead yeast=flat dinner rolls. No one wants those! Always check the expiration date on your yeast before you start baking. I also recommend proofing your yeast whether you’re using active dry or instant. It’s better to take the 5 minutes to proof it than to end up disappointed after hours of baking.
- Measure your flour accurately. It’s easy to scoop a cup of flour that’s packed too tightly, inadvertently using more flour than a recipe calls for. Weigh your flour whenever you can. If you don’t have a kitchen scale, use the spoon-and-level method for an accurate flour measurement.
- Warm the milk. Yeast loves warmth! To help activate it, warm your milk in the microwave for about 15 seconds before you proof the yeast. Whatever you do, don’t use cold milk straight from the fridge.
- Let the dough rise somewhere warm. Similarly, you’ll get the best rise if put the dough somewhere warm. We put ours on a sunny windowsill! A turned-off oven with the light on is a good option too.
Make-Ahead Options
- Prep the dough a day ahead. One day ahead, prepare the recipe up to the point of shaping the rolls. Place them in the baking pan and cover tightly with foil or plastic wrap. Instead of letting the rolls rise at room temperature, refrigerate them overnight. The next day, let them stand at room temperature for 1 hour before baking according to the recipe.
- Bake and freeze. These homemade dinner rolls freeze perfectly! Stash them in a freezer bag or airtight container in the freezer for up to 2 months. Let the frozen rolls thaw for a few hours at room temperature before wrapping them in foil, warming them in a 350°F oven, and serving. (I also like to thaw one roll at a time in the microwave for a quick side dish or snack!)
More Favorite Bread Recipes
If you love these homemade dinner rolls, try one of these easy bread recipes next:

Homemade Dinner Rolls
Ingredients
- 1¼ cups milk, warmed
- 1 (¼-ounce) package active dry yeast, 2¼ teaspoons
- 2 tablespoons sugar
- 5 tablespoons unsalted butter, melted
- 1 teaspoon sea salt
- 3 cups all-purpose flour, spooned and leveled (375g), plus more for kneading
- Extra-virgin-olive oil, for brushing
For topping
- 2 tablespoons unsalted butter, melted
- Sea salt
Instructions
- In the bowl of a stand mixer fitted with a dough hook, stir together the milk, yeast, and 1 tablespoon of the sugar. Proof for 5 minutes, or until the yeast is foamy. If the yeast doesn’t foam, discard the mixture and start again with new yeast.
- Add the remaining sugar, the melted butter, and salt to the bowl. Mix on low speed to combine, then add 1 cup of the flour and mix on low speed until mostly combined. Add another 1 cup of the flour and mix on low speed to combine, then repeat with the remaining cup of flour. Increase the speed to medium and mix for 2 minutes, or until a cohesive, slightly sticky dough forms around the hook. It should be slapping the sides of the bowl and pulling away from the bottom.
- Transfer the dough to a lightly floured surface and knead a few times to form into a ball. The dough should be slightly sticky, but if it’s too sticky to work with, work in a little more flour. Brush a large bowl with olive oil and place the dough inside. Cover with plastic wrap and set aside to rise for 1 to 2 hours, or until the dough has doubled in size.
- Brush a baking sheet or 9x13-inch baking dish with olive oil and set aside. Turn the dough out onto a clean work surface. Divide the dough into 15 equal pieces. Form each piece into a ball by rolling on the countertop with a cupped hand. Place each piece onto the baking sheet. Dust the tops with a very slight amount of flour to prevent sticking. Cover with plastic wrap and set aside for 1 hour, or until puffy.
- Preheat the oven to 350°F and move an oven rack to a low position.
- Bake the rolls for 20 to 25 minutes, or until golden brown, rotating the pan halfway.
- Make the topping: In a small bowl, mix together the melted butter and a pinch of salt. Brush over the warm rolls and serve.


I made these dinner rolls today without deviating from the recipe and they were perfect. They were so easy to put together that I expect to make them often.
Hi Kris, great to hear! So glad you enjoyed the rolls.
Just made these for Thanksgiving dinner and they turned out wonderful. Double the batch because one always runs out of rolls. We are a milk protein allergy family so having these be Vegan is a plus. Followed directions to a T. My dough easily separated from the bowl in the first minute of mixing it and I thought it might be a little too dry as the recipe says that it will be sticky but it rose beautifully. I have a proofing setting on my oven so we just eye-balled it until dough was doubled- I think it took 15-20 mins. It did take a little longer for the second rise- around 20 mins. Used convection oven setting at 350 and baked them for 20 and they turned out beautifully. The flavor is really mild and inside texture light and fluffy. A bit boring in flavor but that is a dinner roll- excited to make these with some herbs and garlic baked in next time. These do not keep well and the few remaining rolls by the end of the evening were already hard and stale so these rolls are a must eat immediately one.
Hi Laura, I’m glad these worked perfectly for you!
You might enjoy the garlic oil we did on top of these garlic knots: https://www.loveandlemons.com/garlic-knots/
Made these last night. They came out perfect. I wasn’t sure which size pan to use, so used the quarter size (about 9×13) & it worked well. I also put the pan in the middle of the oven & it was fine. Now, that I’ve made it once, I’ll make them more often. THANK YOU!
I’m so glad you enjoyed them!
I’ve tried this twice. Epic fail for me. Bottom browns too quickly and top not dark enough. Did a second run with brushing with vegan butter. Not much better. Followed directions. No fluffy rolls. ?
Another winner from Love and Lemons – they came out perfectly!! My other half says these are the best rolls he’s ever had – well done, great recipe (and super easy, too)!
Hi Karen, oh I’m so happy to hear! I’m so glad you both loved them as much as we do!
These came out perfect! These were actually my first attempt at making rolls, though I make other breads, and I was afraid they wouldn’t end up light and fluffy. I didn’t need to worry. Thank you!
I was disappointed in this recipe. First the recipe card is incomplete. It says nothing about heating the mild first. I thought is strange to put cold milk in yeast, but I follow the recipe card. Also, the recipe card does not tell you to add the liquid to the flour. My rolls came out a bit dense and not very flavorful. I suspect had I done it per the long instructions, I may have given it a 3, but with the omissions from the recipe card, it turned out a 2.
Made them exactly as written except I didn’t have as much time to let the rise the second time, only about 30 mins, and still came out delicious! Super super amazing! I think I will need to make them at least once a week and double the batch (we have 5 adults!). The tops of mine were not smooth, but doesn’t matter to me because the outcome was still fabulous.
I’m so glad you loved them!
These came out super tasty but I wasn’t sure which baking sheet size to use. The half sheet seemed way too big for the amount of dough in the recipe. I used a quarter sheet but that was a little small. I’m wondering what size you are thinking of…
Hi Liat, I’ve used both – the regular sized sheet has extra space on it, we just put the rolls in the center of it. The quarter sized sheet (pictured) smushes them a bit more.
Sorry. Forgot to rate it. 5 stars!
By far the very best dinner rolls I’ve ever made. They were fluffy and beautifully browned. Followed the recipe as written. Thank you.
I’m so glad you loved them!
My dough came out on the dry side and I am wondering what I did wrong? Maybe the milk was not warm enough? The dough seems dense… this happens to me all the time LOL Any tips are very appreciated! Thank you.
Hi Beth, did you use the spoon and level method to measure your flour? It’s possible you scooped too much flour. https://www.loveandlemons.com/how-to-measure-flour/
And did you use regular all-purpose flour?
These turned out great, and allowed us to make a whole thanksgiving feast that our guest with dairy allergies could eat and nobody else would notice the difference. We doubled the recipe and used melted vegan buttery sticks, adjusting the butter amount up accordingly (basically, we used 1 cup of butter, doubled the flour and other ingredients, then added more flour bit by bit until the dough felt right). They smelled and tasted great!
Hi Elizabeth, I’m so glad they were a hit!
I made these rolls. They came out pretty good but not light and fluffy enough.
The dough wasn’t really very sticky when mixing. Not very dry but not sticky. I suppose I should add almost all of the flour and add more if needed?
Also, when proofing the yeast do you add the ingredients in a bowl and just let them set or do you mix them first. The recipe said to combine the ingredients. To me, combine and mix are different to me.
Thanks for your feedback.
Hi Susan, I’m glad you enjoyed them. Yes, you can mix the yeast and water. If your dough seemed dry, did you weigh your flour or use the spoon and level method? https://www.loveandlemons.com/how-to-measure-flour/
Why in the world would you recommend baking these on a low rack??? I’m so upset – the bottom of my rolls are completely burnt. My gut told me to put the tray on the middle rack…if I’d listened to it my guests for Thanksgiving would have rolls to eat. Also, I’m very experienced in the kitchen and have no idea how you got your rolls to be so perfect and smooth.
Holy mother of dinner rolls, these turned out PERFECT! Light, tasty, beauhtiful, with just right amount of chew. Made 15 yesterday, we’ve gone thru 7 already (there’s just the 2 of us) – set back 8 in the freezer for Thanksgiving but I’m gonna have to make another batch today, or our guests will be be constrained to just one roll each – and that will not go over well. Thank you!!!
I was very disappointed. They were fine through the first proof. they never fully “puffed ” for the second proof, resulting in flat rolls. extremely frustrated.
Hi Kathy, I’m sorry your rolls didn’t puff. It sounds like it might be your yeast. We had a similar thing happen to us where the yeast was just off (even though it foamed and seemed to rise). Getting new yeast from a different store solved it all.
Can I freeze these before baking? If so, when do I do that in this process? Can’t wait to try!!
Hi Beth, I would bake them, then freeze after they’re baked. Reheat them in the oven until warmed through (or for single servings just reheat one by one in the microwave). I hope you enjoy!
Love love love this recipe!! How do you make the individual roles look so smooth? When i roll them, the seams don’t come together so you can see them in the finished product.
I tried this at 1/2 all purpose flour and 1/2 whole wheat by weight due to unexpectedly being low on all purpose. It’s very delicious! I’d recommend increasing the moisture a little if you’re not going to eat it with soup or something liquid-y. It would make excellent slider breads for anything that’s on the juicier side.
Hi Alison, I’m so glad you enjoyed them!