

Just thinking about this homemade bagel recipe makes my mouth water. It's super easy to make, and it yields delicious, chewy bagels every time.

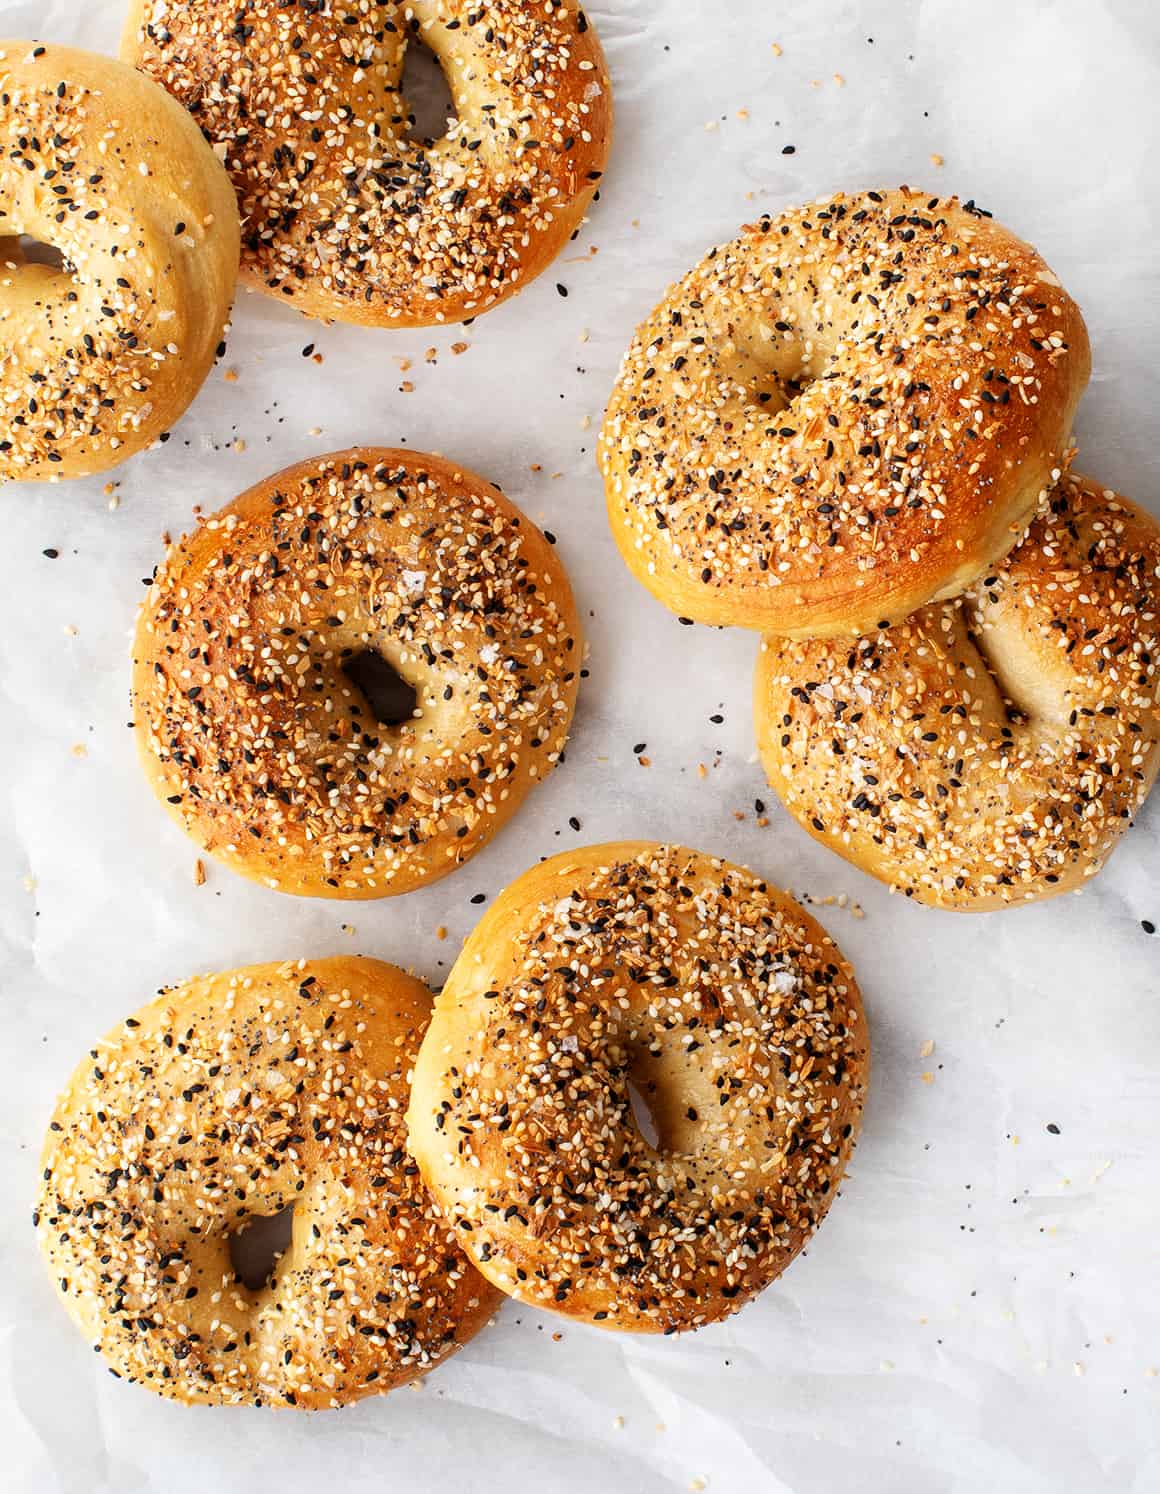
This homemade bagel recipe is Jack’s new favorite thing to bake, and I couldn’t be happier! Like many of you, he’s been baking up a storm lately, churning out crusty loaves of sourdough filled with dried fruit, nuts, or roasted garlic. I love all of it, but I’m especially excited whenever he starts a new batch of bagels. These may be homemade, but they have all the essential qualities of a good bagel: a shiny exterior, a lightly sweet and salty flavor, and a perfect chewy bite. To take them over the top, we coat them generously in crunchy, garlicky Everything Seasoning. My mouth is watering just thinking about it!
If you’re looking for a fun weekend project, give this bagel recipe a try. You only need a few basic ingredients to make it, and it’s surprisingly easy. Best of all, it’s a great recipe to make with someone you love – you can shape the bagels together, and one person can boil them while the other piles on the bagel topping. Then, if you’re anything like Jack and me, you’ll watch them through the oven window as they bake, anticipating eating the warm, puffy homemade bagels fresh out of the oven.

Bagel Recipe Ingredients
This bagel recipe has 3 parts: the dough, the poaching liquid, and the bagel topping. Here’s what you’ll need for each one:
The Dough
- Bread flour – Because of its high protein content, bread flour makes these homemade bagels delightfully chewy. This recipe also works with all-purpose flour, they’re just a bit less chewy than bagels made with bread flour.
- Maple syrup – It activates the yeast and gives the bagels a hint of sweetness.
- Warm water – Along with the maple syrup, it gets the yeast going, and it brings the dough together.
- Active dry yeast – They couldn’t rise without it!
- Sea salt – It’s key for really flavorful homemade bagels.
The Poaching Liquid
Did you know that you have to boil bagels before you bake them? It gives them their signature chewy, shiny coating, and it keeps them from puffing up too much and losing their holes in the oven. I boil them in a mix of maple syrup, baking soda, salt, and water to give them a light golden brown color, a crave-worthy chewy exterior, and a nice shiny finish.
And the toppings!
Everyone has a favorite bagel topping, and Jack and I are 100% on team Everything. We like to coat our bagels in a homemade Everything Bagel Seasoning, but feel free to top them however you’d like! They’re fantastic plain, or with a sesame seed or poppy seed topping.
You can attach the toppings in two ways: with or without an egg wash. I think the egg wash adds an extra-delicious chew, and it helps the topping adhere better to the baked bagels. However, you can also dip the boiled bagels directly into the topping. Without an egg wash, this bagel recipe is vegan.
Find the complete recipe with measurements below.

How to Make Bagels
Ready to learn how to make bagels? Check out this step-by-step guide first, and then find the full recipe at the bottom of this post!
First, make the dough. Activate the yeast by mixing it with warm water and maple syrup. When it foams, add it to the bowl of a stand mixer fitted with a dough hook, and mix it with the flour and salt until the dough is smooth and not sticky, about 5 to 7 minutes.

Then, transfer the dough to a clean work surface and knead by hand for 2 to 3 minutes. Form it into a ball and place it in a large bowl. Cover the bowl with plastic wrap and set it aside for 60 to 90 minutes, until the dough has almost doubled in size.

Now for the fun part: shaping the bagels! Turn the dough out onto an un-floured work surface and divide it into 8 pieces. Roll each piece into a ball.

Sprinkle a few drops of water onto the work surface, and roll each dough ball into a rope about 9 inches long.

Place one hand palm up so that your four fingers are centered on top of the rope. Fold each side of the dough over your fingers, so that the ends overlap by about 2 inches. Holding the dough, turn your hand over and roll it on the countertop to seal the two ends together.
Place the finished bagels onto 2 parchment-lined baking sheets, cover with plastic wrap, and refrigerate overnight.

The next morning, boil and bake! Remove the dough from the fridge, and let it sit at room temperature for 1 hour while you preheat the oven and bring the poaching liquid to a boil.

Working in batches, add the bagels to the boiling water and cook them for 1 minute per side. Return them to the baking sheets, coat them with your desired bagel topping, and bake for 14 to 18 minutes, or until they’re lightly golden brown. Enjoy!

Bagel Recipe Tips
- Weigh your flour. Because this bagel recipe uses a large amount of flour, you should weigh it if you can. This way, you’ll know exactly how much flour you’re using. Cup measurements are much less precise, as they can vary based on a variety of factors (your specific measuring cups, how tightly you pack your flour, etc.). If you don’t have a kitchen scale, check out this post for my best tips on measuring flour with measuring cups.
- Let the dough rise somewhere warm. Yeast responds to warmth, so, for an extra productive rise, stick the dough somewhere warm. We like to put ours on a sunny windowsill!
- Keep it covered. To keep the bagel dough moist and pliable, always cover it with plastic wrap when you’re not working with it. Cover all of it during its initial rise and its overnight rise, and cover any dough you’re not working with while you shape the bagels.
- Don’t boil the bagels until they float. Before you start boiling the bagels, place one into a small bowl of water to see if it floats. If it does, the bagels are ready to cook! If it doesn’t, let the bagel dough proof for an additional 30 minutes, or until one floats. This test ensures that the dough contains plenty of air – if you cook it too soon, your homemade bagels will be dense.

Homemade Bagels Serving Suggestions
Topped with my vegan carrot lox (or regular lox), cream cheese, and classic fixings like cucumbers, capers, and dill, these homemade bagels make a fantastic weekend brunch.
I also like to toast one for a quick breakfast or lunch. Then, I top it with cream cheese, mashed avocado, hummus, or baba ganoush, or I make it into a sandwich. Lately, I’ve been loving these homemade bagels with my egg salad, vegan egg salad, and chickpea salad sandwich fillings.
Store the homemade bagels in an airtight container at room temperature for up to 3 days. For longer storage, freeze them for up to 2 months.

More Favorite Baking Recipes
If you love this bagel recipe, try one of these baking projects next:
- Homemade Cinnamon Rolls
- No-Knead Bread
- Rosemary Focaccia Bread
- Homemade Pizza Dough
- Steamed Bao Buns
- Or any of these 25 Super Fun Baking Recipes!

Homemade Bagels
Ingredients
For the dough
- 1 tablespoon maple syrup or barley malt syrup
- 1 (¼-ounce) pkg active dry yeast, 2¼ teaspoons
- 1¼ cups warm water
- 540 grams bread flour*
- 2 teaspoons sea salt
For the poaching water
- 1½ tablespoons maple syrup
- 2 teaspoons baking soda
- ½ tablespoon salt
For the toppings
- 1 egg white, optional
- 1 tablespoon water, optional
- Everything Bagel Seasoning, for sprinkling
Instructions
- Prepare the dough: In a small bowl, combine the maple syrup, yeast, and water, and proof for 5 minutes or until foamy.
- In the bowl of a mixer fitted with a dough hook attachment, place the flour, salt, and the yeast mixture. Mix on medium-low speed for 5 to 7 minutes, until the dough is well-formed around the hook. If the dough is very dry after 3 minutes, add 1 tablespoon water. (Note: I don't recommend mixing this dough without a stand mixer, it's a stiff dough that gets nice and smooth this way).
- Transfer the dough to a clean work surface and knead 2 to 3 minutes, until smooth and barely tacky, then form into a ball and place into a large bowl. Cover with plastic wrap and set aside in a warm spot for 60 to 90 minutes, until the dough has risen (it may double in size or slightly less).
- Line 2 baking sheets with parchment paper, grease them very lightly with oil, and set aside. Turn the dough out onto a clean, unfloured, work surface and divide into 8 pieces. Form each piece into a ball by rolling on the countertop with a cupped hand. As you work with each piece through the next few steps, keep the dough that you’re not working with covered in plastic wrap.
- Sprinkle a few drops of water onto the countertop. Take each dough ball and roll into a rope about 9 inches long. Place one hand palm up so that your four fingers are centered on top of the rope. Fold each side of the dough over your fingers, so that the ends overlap by about 2 inches. (see photo above). Holding the dough, turn your hand over and roll your hand on the countertop to seal the two ends together.
- Place each finished piece onto a baking sheet. Dust the tops with a very slight amount of flour to keep the plastic wrap from sticking to the dough. Cover with plastic wrap and refrigerate overnight.
- The next morning, remove the pans from the fridge and let sit at room temp for 1 hour.
- Preheat the oven to 450°F.
- Place one bagel into a small bowl of water to make sure it floats. If it sinks, let the dough proof for an additional 30 minutes or until one floats.
- Prepare the poaching water: In a large pot, bring two quarts of water to a boil with the maple syrup, baking soda, and salt.
- Add 3 bagels (or as many that comfortably fit) to the pot, reducing the heat if the water starts to boil over. Boil for 1 minute per side. Transfer the bagels back to the baking sheet, flipping them over so the smooth side is on top. Repeat with remaining bagels.
- Prepare the toppings: Beat the egg white and water together in a small bowl, if desired. Brush the bagels with the egg wash and sprinkle with the seasoning. Alternatively, you can skip the egg wash and dip the top of the bagel straight into the seasoning, but the egg wash helps the seasoning adhere better to the bagel.
- Bake for 14 to 18 minutes or until lightly golden brown.


What are the benefits for refrigerating over night? Would it work the same is I only refrigerate for a couple hours?
Thanks
These are, in the words of my husband, “fantastic”. I made my first attempt this morning. They’re not as pretty as I would like (practice, I assume) but the taste is wonderful.
I’m so glad you both love them!
I was so excited about these- they looked beautiful in the morning and ready to be put in water but they all stuck to the parchment paper. So disappointed .
I’ve made these twice now, and both times they’ve been incredible! Infinitely better than the store bought ones I was eating before – thanks!!
I’m so glad you’ve loved them!
Can you use honey instead of the maple syrup?
Hi, we haven’t tried it, so I can’t say for sure, but I think it would work fine!
Hi! I did and it worked great!
Have you tried other flavor combos other than everything? Would this be a good base to then add other toppings and seasonings? Looking to try a spinach or blueberry.
Hi, we’ve only used this recipe to make bagels with toppings, like everything, sesame, or poppy seed. They’ve all worked great, but I can’t speak to how it would work to add mix-ins to the dough.
This is such a great recipe. I also cover one cup of raisins with water and microwave for 45 seconds, let them sit for 5 minutes, drain and mix those in, along with 2 tsp. of cinnamon during the kneading in the stand mixer. You sometimes need to add a little extra flour to make up for the moisture from the raisins. In any case, makes a really wonderful cinnamon raisin bagel. Worth making two batches everytime.
Do you have to soak the raisins or can you add them as is from a bag?
Do you have to soak the raisins or can you add them from the bag as is?
Soaking them rehydrates them so they stay more whole. I’ve tried not soaking them and they kinda just get torn and blended in with the dough so you don’t end up with raisin chunks in the bagel
Have you ever tried using any whole wheat flour in this recipe?
Hi! Can these stay in the fridge before boiling and baking longer than over night? Thank you!
I was wondering the same thing so I googled and the consensus seemed to be up to 24 hours but one even said 2 days. I’m making them now and plan on letting half chill until Sunday. We shall see how it goes.
It is worth noting, this recipe works perfectly when followed without deviation The absolute best one out there.
Hi Arielle, we haven’t tried them longer than overnight, I’m not sure they would rise properly.
Do you have the old recipe? It looks like this recipe was recently updated with many new steps and different ingredients.
Thus was so much fun making my own Bagels. And they turned out so delicious and beautiful.
So glad you loved them!
My bagels are almost done baking and they’re quite flat, they didn’t really puff up in the oven. When I boiled them they puffed out wider instead of taller (not sure if this has anything to do with it). Any tips?
Hi Diane, Did you change anything about the recipe? If not, there’s a chance the bagels needed more time to proof at room temperature before boiling.
In the middle of trying this recipe right now! Just wondering if I can skip the refrigerate overnight part and boil after 60-90 min on the counter?
Sorry we’re getting to this late! In the future, I’d recommend sticking with the overnight rise.
I was in a bread making mood the other day and came across this recipe, which ended up being perfect since skipping the egg wash would make it 100% vegan. I spent maybe two active hours into the process of making them, and it was really easy!
I ended up overmixing the dough and had trouble shaping them due to this, but they turned out really well. The bagel seasoning you linked worked very well too, and I’m very happy to have found this recipe which had pretty clear, easy instructions. A fun weekend project, all in all!
I’m glad your bagels turned out well!
Do you have any carb, sodium or calorie content information?
I’m sorry, we don’t calculate nutrition info, but you can plug the ingredients into a site like my fitness pal.
Can you use regular flour or does it have to bread flour?
Hi Kim, you can use regular flour.
Wow amazing I did notice using cups measuring for flour had to add about 3tbs of water in when mixing but honestly it came out so good. I also skip the part of adding in the refrigerator and my family was just amazed how good they came out.
I’m so glad they were such a hit!
I want to make these for a book club and plan on making the dough the day beforem can I boil thebagels at home and bake at book club? or should I just get up extra early and boil and bake at home Book club is in the morning and 30 minutes form my home, I wanted to have fresh hot bagels to bring
Hi Beth, they need to be baked right after boiled, so I would bake them at home and then just warm them when you get there.
10/10! I struggle with bread and never seem to get the ‘right bake’ on these types of things. I made these for the first time and can say they tasted like aNY bagel, fluffy, chewy, crisp on the outside. So easy to prep ahead of time (during wfh!). Wouldn’t change anything about the recipe – in my oven they only needed 22-25 min though
I’m so glad you loved them!
How many calories are in each bagel? It would be great to have the nutritional information on each of these recipes!
Hey there!
Could you think of a reason why half of my bagels puffed back up in the oven and the other half didn’t? The ones that didn’t were on the top rack, the ones that did were bottom. Curious if you had any thoughts?
Hi Kyla, I would try putting all of them on the same rack next time – the bottom one, since that worked. Maybe the top rack didn’t get enough heat to puff them quickly? I’ve only baked mine on a single rack, so I’m not sure.