

Just thinking about this homemade bagel recipe makes my mouth water. It's super easy to make, and it yields delicious, chewy bagels every time.

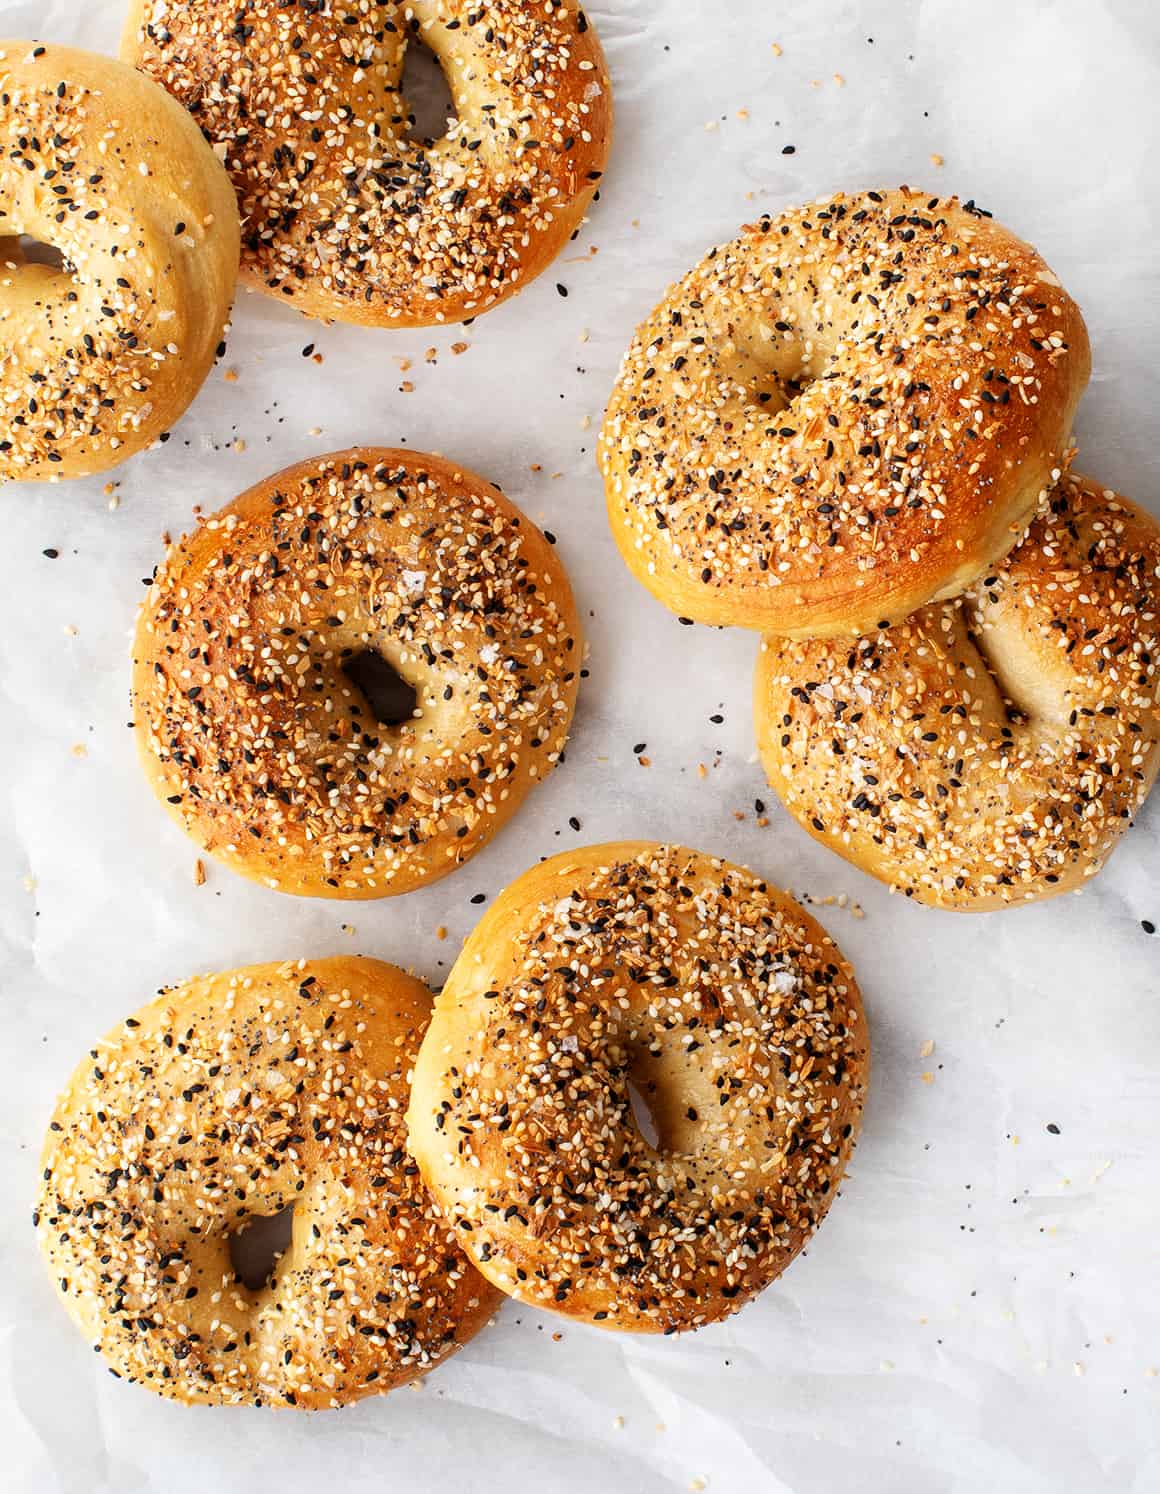
This homemade bagel recipe is Jack’s new favorite thing to bake, and I couldn’t be happier! Like many of you, he’s been baking up a storm lately, churning out crusty loaves of sourdough filled with dried fruit, nuts, or roasted garlic. I love all of it, but I’m especially excited whenever he starts a new batch of bagels. These may be homemade, but they have all the essential qualities of a good bagel: a shiny exterior, a lightly sweet and salty flavor, and a perfect chewy bite. To take them over the top, we coat them generously in crunchy, garlicky Everything Seasoning. My mouth is watering just thinking about it!
If you’re looking for a fun weekend project, give this bagel recipe a try. You only need a few basic ingredients to make it, and it’s surprisingly easy. Best of all, it’s a great recipe to make with someone you love – you can shape the bagels together, and one person can boil them while the other piles on the bagel topping. Then, if you’re anything like Jack and me, you’ll watch them through the oven window as they bake, anticipating eating the warm, puffy homemade bagels fresh out of the oven.

Bagel Recipe Ingredients
This bagel recipe has 3 parts: the dough, the poaching liquid, and the bagel topping. Here’s what you’ll need for each one:
The Dough
- Bread flour – Because of its high protein content, bread flour makes these homemade bagels delightfully chewy. This recipe also works with all-purpose flour, they’re just a bit less chewy than bagels made with bread flour.
- Maple syrup – It activates the yeast and gives the bagels a hint of sweetness.
- Warm water – Along with the maple syrup, it gets the yeast going, and it brings the dough together.
- Active dry yeast – They couldn’t rise without it!
- Sea salt – It’s key for really flavorful homemade bagels.
The Poaching Liquid
Did you know that you have to boil bagels before you bake them? It gives them their signature chewy, shiny coating, and it keeps them from puffing up too much and losing their holes in the oven. I boil them in a mix of maple syrup, baking soda, salt, and water to give them a light golden brown color, a crave-worthy chewy exterior, and a nice shiny finish.
And the toppings!
Everyone has a favorite bagel topping, and Jack and I are 100% on team Everything. We like to coat our bagels in a homemade Everything Bagel Seasoning, but feel free to top them however you’d like! They’re fantastic plain, or with a sesame seed or poppy seed topping.
You can attach the toppings in two ways: with or without an egg wash. I think the egg wash adds an extra-delicious chew, and it helps the topping adhere better to the baked bagels. However, you can also dip the boiled bagels directly into the topping. Without an egg wash, this bagel recipe is vegan.
Find the complete recipe with measurements below.

How to Make Bagels
Ready to learn how to make bagels? Check out this step-by-step guide first, and then find the full recipe at the bottom of this post!
First, make the dough. Activate the yeast by mixing it with warm water and maple syrup. When it foams, add it to the bowl of a stand mixer fitted with a dough hook, and mix it with the flour and salt until the dough is smooth and not sticky, about 5 to 7 minutes.

Then, transfer the dough to a clean work surface and knead by hand for 2 to 3 minutes. Form it into a ball and place it in a large bowl. Cover the bowl with plastic wrap and set it aside for 60 to 90 minutes, until the dough has almost doubled in size.

Now for the fun part: shaping the bagels! Turn the dough out onto an un-floured work surface and divide it into 8 pieces. Roll each piece into a ball.

Sprinkle a few drops of water onto the work surface, and roll each dough ball into a rope about 9 inches long.

Place one hand palm up so that your four fingers are centered on top of the rope. Fold each side of the dough over your fingers, so that the ends overlap by about 2 inches. Holding the dough, turn your hand over and roll it on the countertop to seal the two ends together.
Place the finished bagels onto 2 parchment-lined baking sheets, cover with plastic wrap, and refrigerate overnight.

The next morning, boil and bake! Remove the dough from the fridge, and let it sit at room temperature for 1 hour while you preheat the oven and bring the poaching liquid to a boil.

Working in batches, add the bagels to the boiling water and cook them for 1 minute per side. Return them to the baking sheets, coat them with your desired bagel topping, and bake for 14 to 18 minutes, or until they’re lightly golden brown. Enjoy!

Bagel Recipe Tips
- Weigh your flour. Because this bagel recipe uses a large amount of flour, you should weigh it if you can. This way, you’ll know exactly how much flour you’re using. Cup measurements are much less precise, as they can vary based on a variety of factors (your specific measuring cups, how tightly you pack your flour, etc.). If you don’t have a kitchen scale, check out this post for my best tips on measuring flour with measuring cups.
- Let the dough rise somewhere warm. Yeast responds to warmth, so, for an extra productive rise, stick the dough somewhere warm. We like to put ours on a sunny windowsill!
- Keep it covered. To keep the bagel dough moist and pliable, always cover it with plastic wrap when you’re not working with it. Cover all of it during its initial rise and its overnight rise, and cover any dough you’re not working with while you shape the bagels.
- Don’t boil the bagels until they float. Before you start boiling the bagels, place one into a small bowl of water to see if it floats. If it does, the bagels are ready to cook! If it doesn’t, let the bagel dough proof for an additional 30 minutes, or until one floats. This test ensures that the dough contains plenty of air – if you cook it too soon, your homemade bagels will be dense.

Homemade Bagels Serving Suggestions
Topped with my vegan carrot lox (or regular lox), cream cheese, and classic fixings like cucumbers, capers, and dill, these homemade bagels make a fantastic weekend brunch.
I also like to toast one for a quick breakfast or lunch. Then, I top it with cream cheese, mashed avocado, hummus, or baba ganoush, or I make it into a sandwich. Lately, I’ve been loving these homemade bagels with my egg salad, vegan egg salad, and chickpea salad sandwich fillings.
Store the homemade bagels in an airtight container at room temperature for up to 3 days. For longer storage, freeze them for up to 2 months.

More Favorite Baking Recipes
If you love this bagel recipe, try one of these baking projects next:
- Homemade Cinnamon Rolls
- No-Knead Bread
- Rosemary Focaccia Bread
- Homemade Pizza Dough
- Steamed Bao Buns
- Or any of these 25 Super Fun Baking Recipes!

Homemade Bagels
Ingredients
For the dough
- 1 tablespoon maple syrup or barley malt syrup
- 1 (¼-ounce) pkg active dry yeast, 2¼ teaspoons
- 1¼ cups warm water
- 540 grams bread flour*
- 2 teaspoons sea salt
For the poaching water
- 1½ tablespoons maple syrup
- 2 teaspoons baking soda
- ½ tablespoon salt
For the toppings
- 1 egg white, optional
- 1 tablespoon water, optional
- Everything Bagel Seasoning, for sprinkling
Instructions
- Prepare the dough: In a small bowl, combine the maple syrup, yeast, and water, and proof for 5 minutes or until foamy.
- In the bowl of a mixer fitted with a dough hook attachment, place the flour, salt, and the yeast mixture. Mix on medium-low speed for 5 to 7 minutes, until the dough is well-formed around the hook. If the dough is very dry after 3 minutes, add 1 tablespoon water. (Note: I don't recommend mixing this dough without a stand mixer, it's a stiff dough that gets nice and smooth this way).
- Transfer the dough to a clean work surface and knead 2 to 3 minutes, until smooth and barely tacky, then form into a ball and place into a large bowl. Cover with plastic wrap and set aside in a warm spot for 60 to 90 minutes, until the dough has risen (it may double in size or slightly less).
- Line 2 baking sheets with parchment paper, grease them very lightly with oil, and set aside. Turn the dough out onto a clean, unfloured, work surface and divide into 8 pieces. Form each piece into a ball by rolling on the countertop with a cupped hand. As you work with each piece through the next few steps, keep the dough that you’re not working with covered in plastic wrap.
- Sprinkle a few drops of water onto the countertop. Take each dough ball and roll into a rope about 9 inches long. Place one hand palm up so that your four fingers are centered on top of the rope. Fold each side of the dough over your fingers, so that the ends overlap by about 2 inches. (see photo above). Holding the dough, turn your hand over and roll your hand on the countertop to seal the two ends together.
- Place each finished piece onto a baking sheet. Dust the tops with a very slight amount of flour to keep the plastic wrap from sticking to the dough. Cover with plastic wrap and refrigerate overnight.
- The next morning, remove the pans from the fridge and let sit at room temp for 1 hour.
- Preheat the oven to 450°F.
- Place one bagel into a small bowl of water to make sure it floats. If it sinks, let the dough proof for an additional 30 minutes or until one floats.
- Prepare the poaching water: In a large pot, bring two quarts of water to a boil with the maple syrup, baking soda, and salt.
- Add 3 bagels (or as many that comfortably fit) to the pot, reducing the heat if the water starts to boil over. Boil for 1 minute per side. Transfer the bagels back to the baking sheet, flipping them over so the smooth side is on top. Repeat with remaining bagels.
- Prepare the toppings: Beat the egg white and water together in a small bowl, if desired. Brush the bagels with the egg wash and sprinkle with the seasoning. Alternatively, you can skip the egg wash and dip the top of the bagel straight into the seasoning, but the egg wash helps the seasoning adhere better to the bagel.
- Bake for 14 to 18 minutes or until lightly golden brown.


Thanks for the recipe! Mine tasted good, but were flat and wrinkly. They were very puffy and passed the float test before I boiled them, but they immediately collapsed when I slid them into the boiling water. Any ideas why that might be?
Hi Julien, when they’ve flattened in the water for me, they puffed back up in the oven. If yours didn’t, I’d try using new yeast next time. Right now, some places are selling expired yeast.
This can happen if the dough is over proofed. It will still float because it’s full of air but the air pocket collapses when cooked and can’t recover. Try floating the bagels sooner after resting out of fridge. Mine passed the float test after 30 minutes so I went ahead and boiled them sooner.
I made these with 5 oz of whole wheat and 14 oz of AP (everything was weighed via food scale) and then followed the recipe exactly- but also lightly oiled the parchment paper and lightly floured the rolled, shaped bagels and they turned out amazing! of the 8 we made 3 plain, one with black pepper, 2 with garlic and sea salt, and 2 with everything toppings! I did all of this without a stand mixer and by hand- so it took a while, but I am used to making most of my breads/naans/roti by hand so this wasn’t too different. The dough is definitely firm to work with- but nothing impossible. Tagged you in my Instagram story post too! adding this to my monthly routine!
PS I’ll be making a batch with a few craisins next but keeping the garlic and everything toppings in our rotation!
Hi Suhagi, I’m so glad you loved them so much! Love all of your delicious topping ideas 🙂
Hi. They sound quite nice. My problem is I haven’t been able to buy much flour without additives. Right now I have Spelt, Whole Wheat, and Buckwheat. Any chance any, all, mix, of these will make good bagels?
Also, when you can, could you respond to Erika’s question about when to add other ingredients.
Thanks. 🙂
Hi Lori, I haven’t tested with any of those flours, so I can’t say that they’d work 100%. Of those, spelt is the closest to all purpose, so that would be my first choice. I know some readers have used partial whole wheat, but I think mixing it with AP would be best. I’d stay away from the buckwheat for this one, it would be too dense. If you have a kitchen scale, I’d add by weight vs. volume since some of those flours are heavier than AP.
I’d add mix-ins in step 2 after the other ingredients are mixed together. I’d stick to dried fruit (raisins, cranberries, dried blueberries, if fresh blueberries burst, it could affect the moisture level.
Hope that helps!
Hey Jeanine, I want to love this recipe so bad, but I have mixed feelings.
We tried this recipe and followed the instructions step by step; however, our bagels did not rise nor taste like an actual bagel.
On the contrary, they tasted bland and shaped flat. Where did you think we may have gone wrong?
Hi Dahyana, if they didn’t rise it sounds like it’s an issue with your yeast. During this time, a lot of places have been selling expired yeast. We had some last week that, even though it foamed, it affected our baking rises. When we got new yeast, our baked goods were puffy again – it was a night and day difference even though we were making the same recipe.
Do you have gluten-free substitutions, perhaps without rice or oats, either?
I’m sorry, I haven’t tested these to be gluten free. I’d search specifically for a gluten free bagel recipe because I’d guess that other modifications would have to be made than a 1:1 flour swap.
I made these last weekend with AP flour and they turned out great! No issues with the bagels sticking to the parchment paper. Question though: I want to use this recipe as a base but would like to make blueberry bagels or jalapeño cheddar bagels, at what step do you recommend adding these ingredients?
Hi Erika, I’m so glad you loved them!
I’d add mix-ins in step 2 just after the other ingredients are mixed together. I’d stick to dried fruit (raisins, cranberries, dried blueberries). If fresh blueberries burst, it could affect the moisture level. I could see jalapeños working since they’re not as wet as fruit. I’d sprinkle the cheese on top, just before baking. I haven’t tried any of these, so I can’t say how the texture of the dough might change – can you let me know which mix-ins you have success with?
Hope that helps!
Hi Jeanine!
Thanks for taking the time to respond. I’ve made this bagel recipe now 3 times (AP flour for all), with the last 2 times including medium cheddar cheese and jalapeño and they turned out soo good both times! Even chewier than the first time.
I added minced jalapeño (and a bit of cheese) during kneading (step 3), skipped the brushing of egg whites and added cheese on top just before putting them in the oven. Thanks so much for this!! It will be a staple recipe in our household.
I plan to use AP flour as well but don’t have a scale. I see that it says 4 1/3 cup or whatever it was but that’s for bread flour. Do you know if this would be the same for AP?
I made these this am and (YUMMM) but the uncooked bagels stuck to the parchment and I had to do this crazy dip them in water thing to try to peel the parchment off to get them into the boiling water without deflating them. Any tips?
Hi Christine – I’m glad you loved them! Did you grease the parchment paper?
I didn’t grease the parchment. Do you think that would be a good idea?
Yep, wipe a little bit on with a paper towel, you don’t want the surface very oily but a tiny bit will help them not stick. I also added a tip to brush a teeny bit of flour on top of the dough to help the plastic covering not stick. Hope that helps!
Hi there—there seems to be a mistake in the conversion from grams to cups. The recipe says it’s 4 1/3 cups when it’s actually closer to 2 1/4 cups. I didn’t think about it and used 4 1/3 cups and had to start all over. Dry as a bone and just some crumbles in the mixer that never made a ball. It was a big waste of flour and other ingredients and pretty detrimental in this time of covid where flour and yeast is increasingly hard to get! Anyways, I’m excited to try these bagels in the morning, the recipe looks beautiful, but please edit the instructions so no one makes my mistake again ?
Hi Maggie, 1 cup of bread flour is 125 grams. I highly recommend weighing the flour here because measuring by hand can be inaccurate and can yield too much flour.
Hi Jeanine,
I agree, but unfortunately I don’t have a working scale ? googling will give you multiple results for how much a cup of flower weighs (I know, it’s an inaccurate way of measurement and the conversion isn’t exact), and some results come up with 2 1/4 cups. Especially bread flour, which is heavier than all purpose. Just a word of warning because 4 1/3 cups was totally unusable! ? It was disproportionately flour in the mixture.
Hi Maggie,
I totally understand that a scale isn’t an every day tool. I think the problem might have to do with how tightly the cups were packed. Measured flour is most accurate when it’s fluffed up first (not tightly packed from the package), and then spooned into the cup and leveled with a knife. If you scoop the measuring cup directly into the flour, you’ll get a lot more flour in the cup. I just tested two weights on my scale: 1 cup bread flour (fluffed) spooned and leveled equals 125 grams. 1 cup bread flour tightly scooped can equal up to 155 grams, which would be too much for this recipe. I hope this is helpuful, and I hope the next round works out for you!
I just made these bagels and they are fantastic!
I grew up in Jersey, with the best bagels. Moved to south Texas 5 years ago and can’t find a decent bagels anywhere. I’ve tried a few different recipes and they were okay. This is by far the BEST recipe! I like how you said exactly how the dough should feel and how to roll them like a professional bagel maker.
Thank you so much for sharing the recipe. This will be the only one I use going forward.
Hi there! Just wanted to comment (not meaning to be aggressive at all), but I also do not have a scale and I did use bread flour as recommended, I measured out 4 1/3 cups by hand, and I have made this recipe many times and each time it turns out wonderful! So I do think that the conversion is accurate, just try to follow Jeanine’s tips for measuring flour by hand in the most accurate way possible and I think you might find more success! Also, during the mixing process in the stand-up mixer, I found that using her tip of adding a tablespoon of water about halfway through the mixing process really helps to moisten the dough and allows it to better form into a ball-like shape that can then be completed when you knead the dough by hand. Again, I am not meaning to attack you or your comment, but I just don’t want others who do not have a scale to think that the conversion is inaccurate because like I said I make these bagels all the time with no issues. Have a good day!
Hi Grace, I’m glad measuring tips were helpful and I’m so happy you’ve been enjoying the bagels. 🙂
I plan to use AP flour as well but don’t have a scale. I see that it says 4 1/3 cup or whatever it was but that’s for bread flour. Do you know if this would be the same for AP? Thanks 🙂
Hi Virginia, you can use the same AP measurement as bread flour.
I made them and I think they are great. I did have to use her tip and add about 2 tablespoons of water while in the mixer and then it started to shape well. I think this was a great recipe. Thank you
I’m sorry you didn’t enjoy these.
Just pulled these out of the oven and had one for breakfast! I followed the recipe exactly (with AP flour instead of bread flour), and the only complication I encountered was getting them off the baking sheet and into the boiling water without disturbing their shape too badly. Some of them turned out a bit wonky, but they still taste amazing!
I’m so glad you loved them!
A tip for the baking paper issue is to actually lay them on cut squares of baking paper. Fiddly yes. But it means you just pop the bagel face down in the water then the paper comes off easy!!
This looks so easy. I will definitely make it for my kids.
They all look beautiful & spacious. You have a lovely collection.
Hey! I cant wait to try these. I was just wondering if I can use whole wheat flour? And if so, is there anything in the recipe I’d have to adjust? Thanks!
Hi Kay, I haven’t tried them with whole wheat flour so I can’t say. It usually acts very different and this recipe is super precise, so I don’t think it would work without possible other modifications.
Hi tried this recipe was great but my dough stuck the the baking paper whist in the fridge! When trying to peel them off think I knocked out loads of the air and they were then mis shaped?? Any clue on how to solve the sticking? Thanks
Hi Charlotte, if one passes the float test (step 9), then keep going. Otherwise, let them proof in the fridge longer to puff back up. It shouldn’t stick too badly with parchment paper on the bottom (are you using regular parchment paper?). Ours sticks a little to the plastic covering on top. Just peel it back as gently as you can. If they float, then continue to boil and bake and they should puff up in the oven.
Hmmm so good look this food and delicious. You have 5 stars.
Hi,
I have a very hard time shaping the bagel very resilient the dough
Please help
Hi Ildi, the dough should be very stiff. Did you mix it in the stand mixer so that it’s a smooth ball?
After rising, be sure you’re not using flour on the countertop to roll the smaller balls into the ropes. The rope should be long enough to wrap around your hand. Then roll the seam, palm side down, against the (unfloured) countertop to seal the seam. If the two ends aren’t sticking together, you can dab a little water on it.
Hi, Your bagel looks fabulous! Great photo too!
Why the baking soda in the boiling water?
Thanks
Hi Ildi, it’s what gives the outside of the bagel it’s chewiness.
Love the recipe, very easy it make, but mine did not rise looked more like a bealli
Only issue I’ve had is limiting myself to eating one after baking them! Using the scale made a world of difference, so definitely second that recommendation.
I use baking soda in boiling water before roasting cubed potatoes, then stir them lightly when they’re barely fork tender. It makes the an uneven tacky surface which creates an extremely crunchy shell, I havent tried the bagel recipe yet, but it may be a similar concept. I would highly recommend trying the potato trick
Mine weren’t nearly this beautiful, but they were delicious! I’ve been searching for a bagel recipe that doesn’t require the hard-to-find ingredients usually required. Thanks!
I’m so glad you loved them!
Hi! Do you think it would work with gluten free all purpose flour? These look delicious!
Hi Sarah, I haven’t tried, but I don’t think so – I’d probably search for a recipe that’s specifically for Gluten Free Bagels because I think other modifications would have to be made.
I made it with gluten free all purpose flour (the Bob’s Red Mill kind) and it worked fine. As gluten free flour is more dense than normal flour, dense recipes like this one normally work fine!
Hi! Can I use my food processor to mix the dough if I don’t have a stand mixer?
I’m not sure, I haven’t tried (and I don’t have a big enough food processor for this large amount). It’s a really stiff dough… I’m not sure if it would stress the food processor blade too much.
A food processor will work and is an option when the dough is too stiff for the standing mixer which may be the case here (water at only 54% of the flour). Also,, the friction on mixing a stiff dough for 5-7 minutes will cause it to heat up too much. A food processor will require less time therefore less friction. The desired dough temperature when mixing is complete is usually 76F.